Building a RAG-Based Chatbot with Amazon Bedrock, React and Lambda (PART 2)
Building a RAG-Based Chatbot with Amazon Bedrock, React, and Lambda (PART 2)
Table of Contents
A. Introduction
In the previous article, we built a RAG (Retrieval-Augmented Generation) agent using Amazon Bedrock. The agent answers customer queries about training courses by combining static information from a CSV file (stored in the Bedrock Knowledge Base) and real-time course status from DynamoDB.
In this second part, we will:
- Build a backend REST API using Python Lambda to invoke the Bedrock RAG agent.
- Develop a frontend chatbot application using React and the React Chatbotify component.
- Host the React application as a static website on S3.
- Integrate the frontend and backend using API Gateway.
- Provide full code for both the backend (Python) and frontend (JavaScript).
Prerequisites: You must have completed Part 1 to set up the RAG agent, knowledge base, and agent Lambda function.
B. Background
System Overview
The chatbot application consists of three main components:
- Backend:
- A Python Lambda function that invokes the Bedrock RAG agent.
- Integrated with API Gateway to expose the REST API.
- Frontend:
- A React application with a chatbot interface.
- Uses the React Chatbotify component for an easy-to-build and customizable chatbot UI.
- Hosted as a static website on S3 for scalability and cost-effectiveness.
- Integration:
- The React frontend sends user queries to the backend API.
- The backend invokes the Bedrock RAG agent and returns the response to the frontend.
Why Use S3 for Hosting?
- Cost-Effective: S3 is a low-cost solution for hosting static single page application.
- Scalable: S3 can handle high traffic loads with ease.
- Easy to Deploy: Deploying a React app to S3 is straightforward and requires minimal configuration.
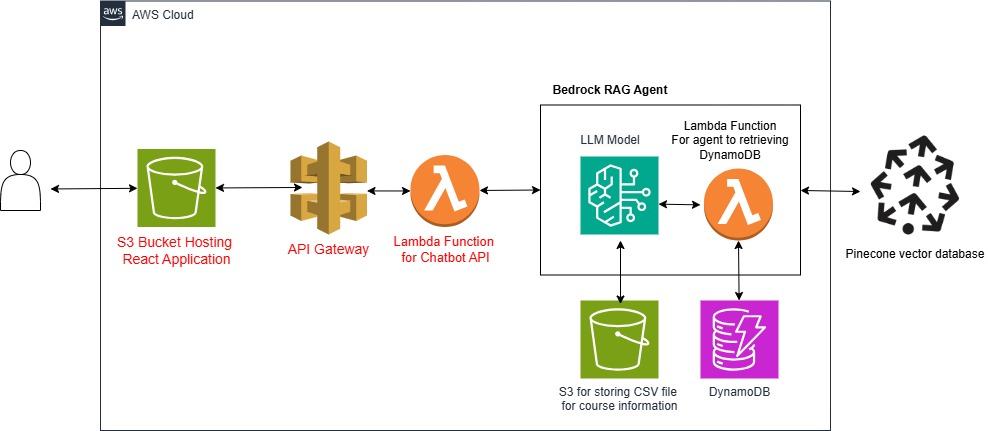
In this article, we will focus the the frontend component, which is red in color in the above architecture diagram
C. Backend Chatbot API
1. REST API with Python Lambda
We use a REST API in this project for simplicity. For better performance and user experience in production, you may consider using WebSocket or Server-Sent Events (SSE) for real-time communication. However, this will not be in the scope of this article.
Lambda Function Code
The Lambda function uses boto3 python package to invoke the Bedrock RAG agent and fetch responses.
import json
import os
import boto3
import uuid
from typing import Dict, Any

bedrock_agent_runtime = boto3.client('bedrock-agent-runtime')

# Get from environment variables
AGENT_ID = "YOUR_AGENT_ID"
AGENT_ALIAS_ID = "YOUR_AGENT_ALIAS_ID"

def lambda_handler(event: Dict[str, Any], context) -> Dict[str, Any]:
    """
    Lambda handler for Bedrock Agent Runtime API
    """
    try:
        # Parse the request body
        body = {}
        if event.get('body'):
            body = json.loads(event.get('body', '{}'))

        return handle_agent_request(body)

    except Exception as e:
        return create_response(500, {'error': str(e)})

def handle_agent_request(body: Dict[str, Any]) -> Dict[str, Any]:
    """
    Handle requests to the Bedrock agent
    """
    try:
        # Validate input
        prompt = body.get('prompt')
        if not prompt:
            return create_response(400, {'error': 'Prompt is required'})

        # Get or create session ID
        session_id = body.get('session_id', str(uuid.uuid4()))

        # Validate environment variables
        if not AGENT_ID or not AGENT_ALIAS_ID:
            return create_response(500, {'error': 'Missing required environment variables'})

        # Invoke the Bedrock agent
        response = bedrock_agent_runtime.invoke_agent(
            agentId=AGENT_ID,
            agentAliasId=AGENT_ALIAS_ID,
            sessionId=session_id,
            inputText=prompt
        )

        # Process the response
        completion = ""
        for event in response.get("completion", []):
            chunk = event.get("chunk", {})
            if chunk:
                completion += chunk.get("bytes", b"").decode()

        return create_response(200, {
            'response': completion,
            'session_id': session_id
        })

    except bedrock_agent_runtime.exceptions.ValidationException as e:
        return create_response(400, {'error': str(e)})
    except Exception as e:
        return create_response(500, {'error': str(e)})

def create_response(status_code: int, body: Dict[str, Any]) -> Dict[str, Any]:
    """
    Create a formatted API Gateway response
    """
    return {
        'statusCode': status_code,
        'headers': {
            'Access-Control-Allow-Headers': 'Content-Type',
            'Access-Control-Allow-Origin': '*',
            'Access-Control-Allow-Methods': 'OPTIONS,POST,GET'
        },
        'body': json.dumps(body)
    }
API Gateway Integration
- Create an API Gateway REST API.
- Add a POST method with the Lambda function as the integration target.
- Deploy the API and note the invoke URL (e.g.,
https://api-id.execute-api.us-east-1.amazonaws.com/prod/query).
Testing the API
Use tools like Postman or cURL to test the API:
curl -X POST https://api-id.execute-api.us-east-1.amazonaws.com/prod/query \
-H "Content-Type: application/json" \
-d '{"prompt": "Is the Python course still open?"}'
D. Frontend Chatbot Application
1. React Application
We use React Js to build the chatbot interface. The React Chatbotify component simplifies the process of creating a chatbot UI.
Install React Chatbotify
npm install react-chatbotify
Chatbot Component Code
import { useState } from 'react'
import './App.css'
import React from "react";
import ChatBot from "react-chatbotify";

function App() {
  const [sessionId, setSessionId] = useState(() => {
    // Generate a random session ID on first load
    return Math.random().toString(36).substring(2, 15);
  });

  //const chatApiUrl = "/api/chat";
  const chatApiUrl = "YOUR_API_GATEWAY_URL";

  const settings = {
    general: {
      embedded: true
    },
    header :{
      showAvatar: false,
      title : "Course Assistant"
    },
    footer :{
      text : "ABC Training Center"
    }
  }

  async function chat(params) {

    console.log(params.userInput);
    console.log(sessionId);
    const response = await fetch(chatApiUrl, {
      mode: 'cors', // no-cors, *cors, same-origin
      cache: 'no-cache', // *default, no-cache, reload, force-cache, only-if-cached
      credentials: 'same-origin', // include, *same-origin, omit
      method: 'POST',
      headers: {
          'Content-Type': 'application/json',
          'Accept': 'application/json'
      },
      body: JSON.stringify({
        prompt: params.userInput,
        session_id: sessionId
      })
    });

    const data = await response.json();

    let responseText = '';
    responseText = data.response;

    // Update session ID if it's returned in the response
    if (data.session_id) {
      setSessionId(data.session_id);
    }

    return responseText;
  }

  const flow = {
    start: {
      message: "Hello, I am your Course Assistant! How can I help you?",
      path: "chat_loop",
    },
    chat_loop: {
      message: async (params) => {
        console.log(params);
        return await chat(params);
      },
      path: "chat_loop"
    },
  }

  return (
    <>
      <h2 style={{ marginTop: 0 }}>Training Center Assistant Demo </h2>

        <ChatBot settings={settings}   flow={flow}/>

    </>
  )
}

export default App
Key Features of React Chatbotify
- Customizable UI: Easily change colors, fonts, and layouts.
- Prebuilt Components: Includes message bubbles, input fields, and typing indicators.
- Lightweight: Minimal dependencies and fast performance.
E. Deploy React Application to S3
To host the React app as a static website on S3, follow these steps:
Step 1: Build the React App
Run the following command to create a production build:
npm run build
This generates a build folder containing the optimized static files.
Step 2: Create an S3 Bucket
- Go to the S3 Console and create a new bucket.
- Enable Static Website Hosting in the bucket properties:
- Set the index document to
index.html. - Set the error document to
index.html(for single-page applications).
- Set the index document to
Step 3: Upload the Build Files
- Upload the contents of the
buildfolder to the S3 bucket. - Set the bucket policy to make the files publicly accessible:
{
"Version": "2012-10-17",
"Statement": [
	{
      "Sid": "PublicReadGetObject",
      "Effect": "Allow",
      "Principal": "*",
      "Action": "s3:GetObject",
      "Resource": "arn:aws:s3:::YOUR_BUCKET_NAME/*"
	}
]
}
Step 4: Access the Website
Use the S3 bucket’s Static Website Hosting URL (e.g., http://YOUR_BUCKET_NAME.s3-website-us-east-1.amazonaws.com) to access the chatbot.
F. Resulting Application
Once the frontend and backend are deployed, you’ll have a fully functional chatbot:
- The user types a query (e.g., "Is the Python course still open?").
- The React app sends the query to the backend API.
- The Lambda function invokes the Bedrock RAG agent and retrieves the response.
- The response is displayed in the chatbot interface.
G. Conclusion
Summary
In this two-part series, we built a RAG-based chatbot using:
- Amazon Bedrock for the RAG agent and knowledge base.
- DynamoDB for real-time course status.
- Lambda and API Gateway for the backend REST API.
- React and React Chatbotify for the frontend chatbot interface.
- S3 for hosting the React application as a static website.
Advantages of this solution
- Accurate Responses: Combines static knowledge (CSV) with real-time data (DynamoDB) for accurate and up-to-date answers.
- Scalability: AWS services like Lambda, S3, and Bedrock are highly scalable and cost-effective.
- Ease of Integration: Bedrock’s seamless integration with other AWS services simplifies development.
- Customizable Frontend: React Chatbotify provides a flexible and user-friendly chatbot interface.
Further Security Considerations for S3 Static Website Hosting of Chatbot:
- It is recommended to add Cloudfront infront of the S3 bucket. This enhances security by acting as a CDN (Content Delivery Network) and providing DDoS protection, caching, and HTTPS support. It also hides the S3 bucket endpoint, reducing direct exposure to the public.
- You should set OAC (Orgin of access) for the cloudfront. This restricts access to the S3 bucket, allowing only CloudFront to retrieve objects. This prevents unauthorized direct access to the S3 bucket, improving data security and compliance.
You can find the details instruction of the above secuirty setting in AWS documentation website.
Final Thoughts
By leveraging Amazon Bedrock and RAG, you can build intelligent, scalable, and user-friendly applications that deliver exceptional customer experiences. This tutorial demonstrates how to integrate AWS services with modern frontend technologies to create a powerful chatbot solution. Whether you’re building a training center assistant or any other knowledge-based application, the combination of Bedrock, Lambda, and React provides a robust foundation for your projects.
Happy coding! 🚀
Source code of the REST API and React JS can be found in Github
