Building a RAG AI Workflow with n8n, AWS ECS, Aurora PGVector Store and Amazon Bedrock
Table of Contents
1. Introduction
This article builds on a previous guide for setting up an n8n AI agent in Amazon ECS. We now present a complete solution for deploying a functional Retrieval-Augmented Generation (RAG) AI agent on AWS using n8n.
As noted in the previous article, n8n workflow data is lost when ECS tasks or instances in the cluster restart. To solve this, we integrate Amazon EFS to provide persistent, shared storage for n8n metadata, ensuring data durability across restarts.
We use Amazon Aurora Serverless PostgreSQL with the PGVector extension as our vector store. This enables efficient similarity searches for document-based queries within the chatbot.
This guide assumes you have already created an ECS cluster, service, and an Application Load Balancer (ALB) for hosting the n8n workflow. If you have not, please follow the previous article first.
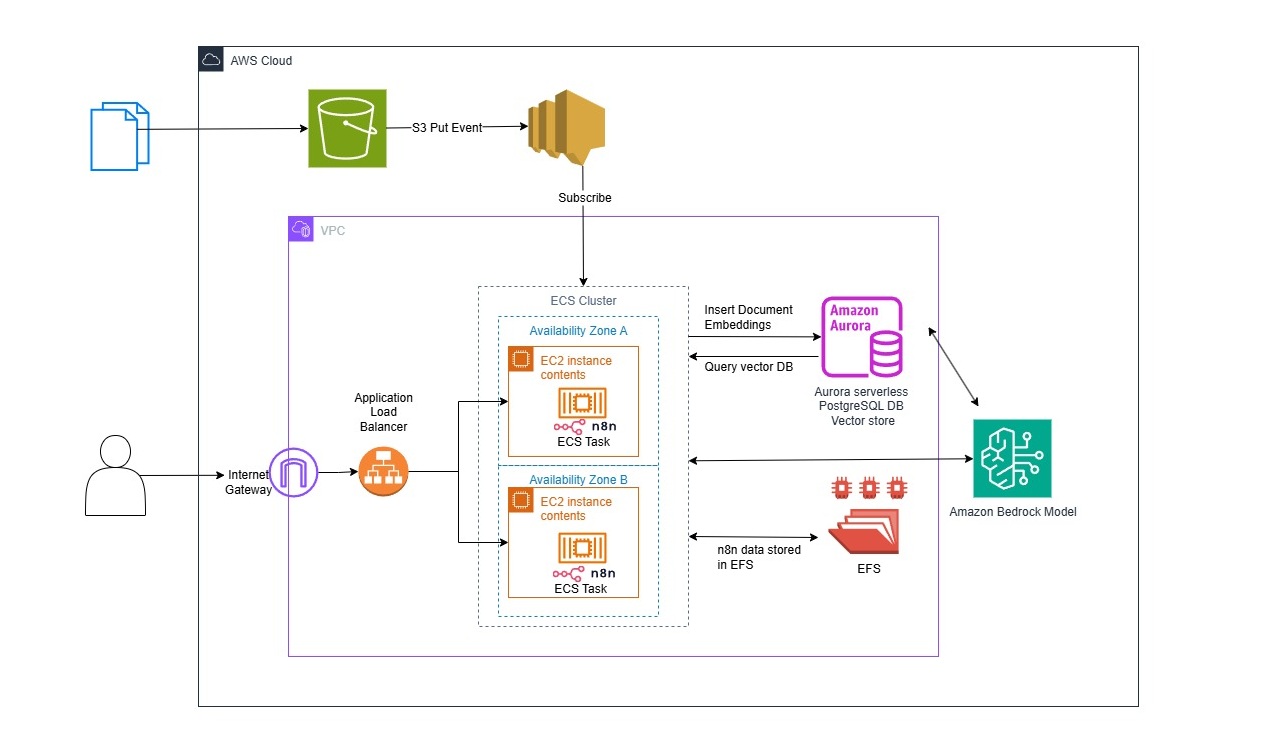
2. Architecture
The solution architecture includes:
- Amazon ECS Cluster: Hosts containerized n8n services for scalable workflow execution.
- Amazon EFS (Elastic File System): Provides persistent, shared storage for n8n's metadata and configurations.
- Amazon Aurora Serverless PostgreSQL: Acts as the vector database with PGVector for storing and querying embeddings.
- Amazon S3 Bucket: Stores uploaded documents for RAG (e.g., a college handbook in this example).
- Amazon SNS (Simple Notification Service): Notifies n8n workflows of S3 object upload events, triggering document loading and insert embedding to Vector DB.
- Amazon Bedrock Models: Supplies the large language model (LLM) for generating responses in the RAG agent.
- Cohere Models: Third party models to handle embedding generation and reranking for improved retrieval accuracy, integrated with the vector store.
Two n8n workflows are key:
- Document Upload Workflow: Processes S3 uploads, generates embeddings, and inserts them into the vector DB.
- RAG Query Workflow: Retrieves relevant embeddings from the DB, reranks results, and uses the LLM to answer user queries.
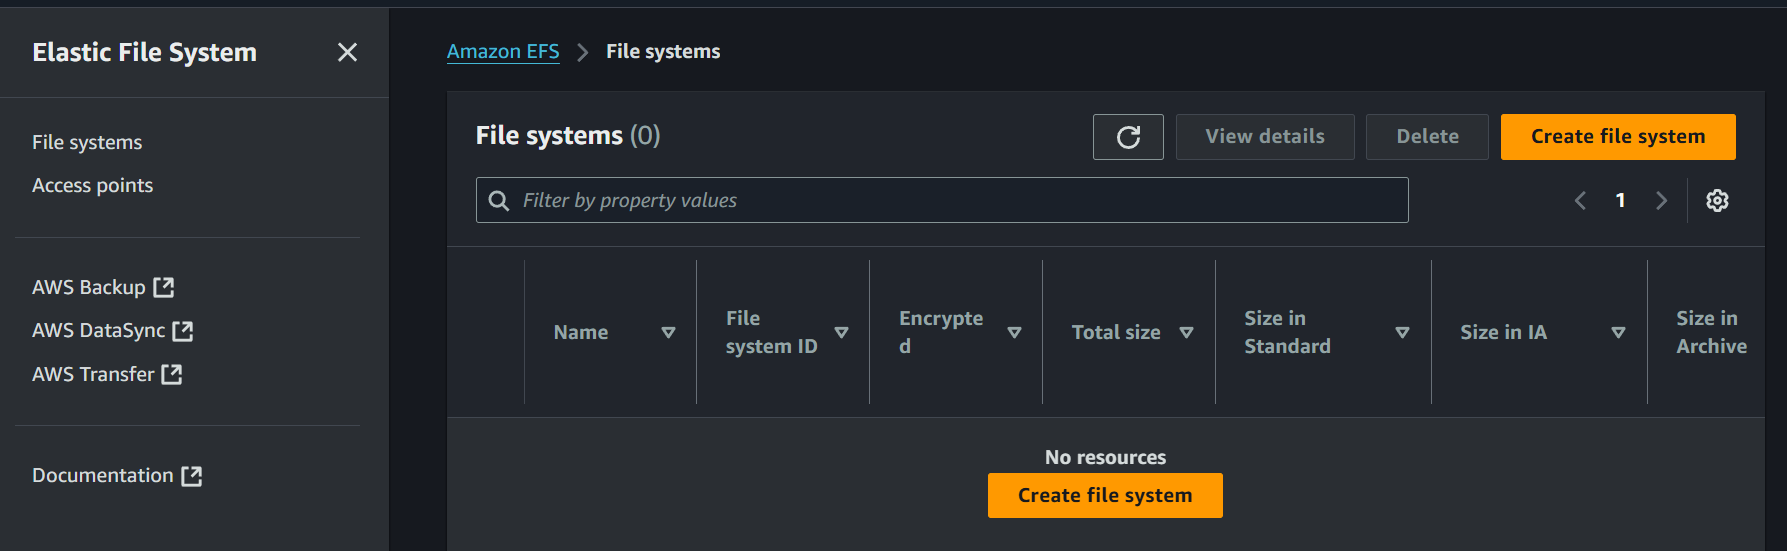
3. Create EFS File System and update ECS Task definition
The first step is to setup EFS for persistent storage of n8n workflow.
Create EFS File System and Update ECS Task Definition
- Go to EFS service in AWS Console
- Click Create file system
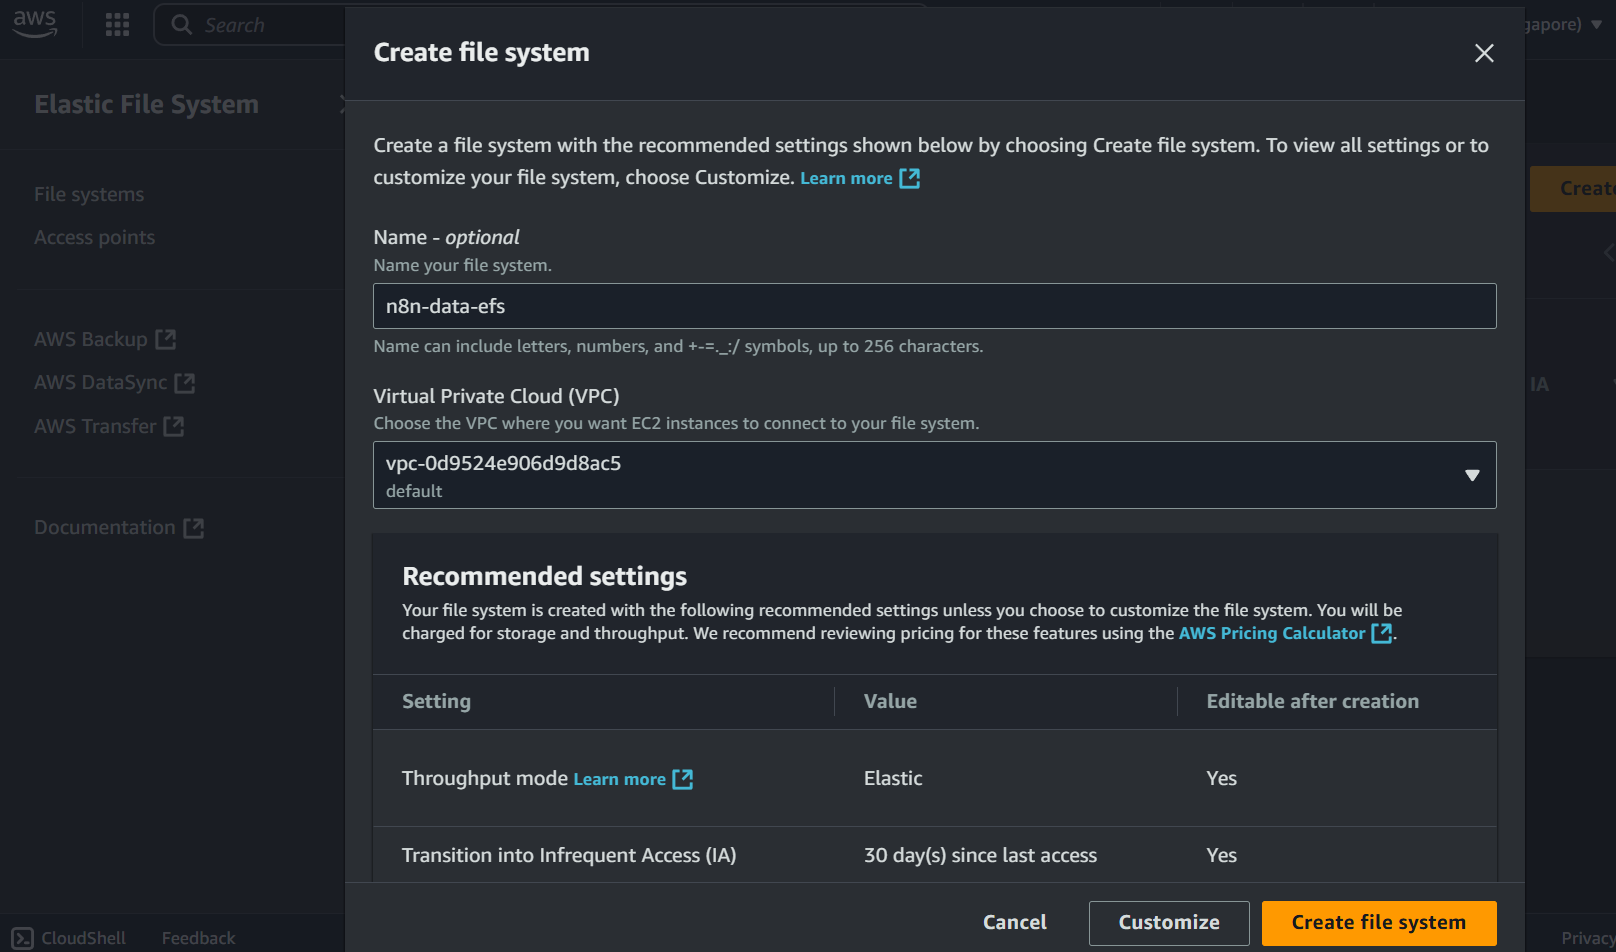
- Choose Customize for advanced options
- Input EFS Name:
n8n-data-efs - Select Performance mode:
General Purpose - Select Throughput mode:
ProvisionedorBursting - Input Encryption: Check Enable encryption of data at rest
- Click Next
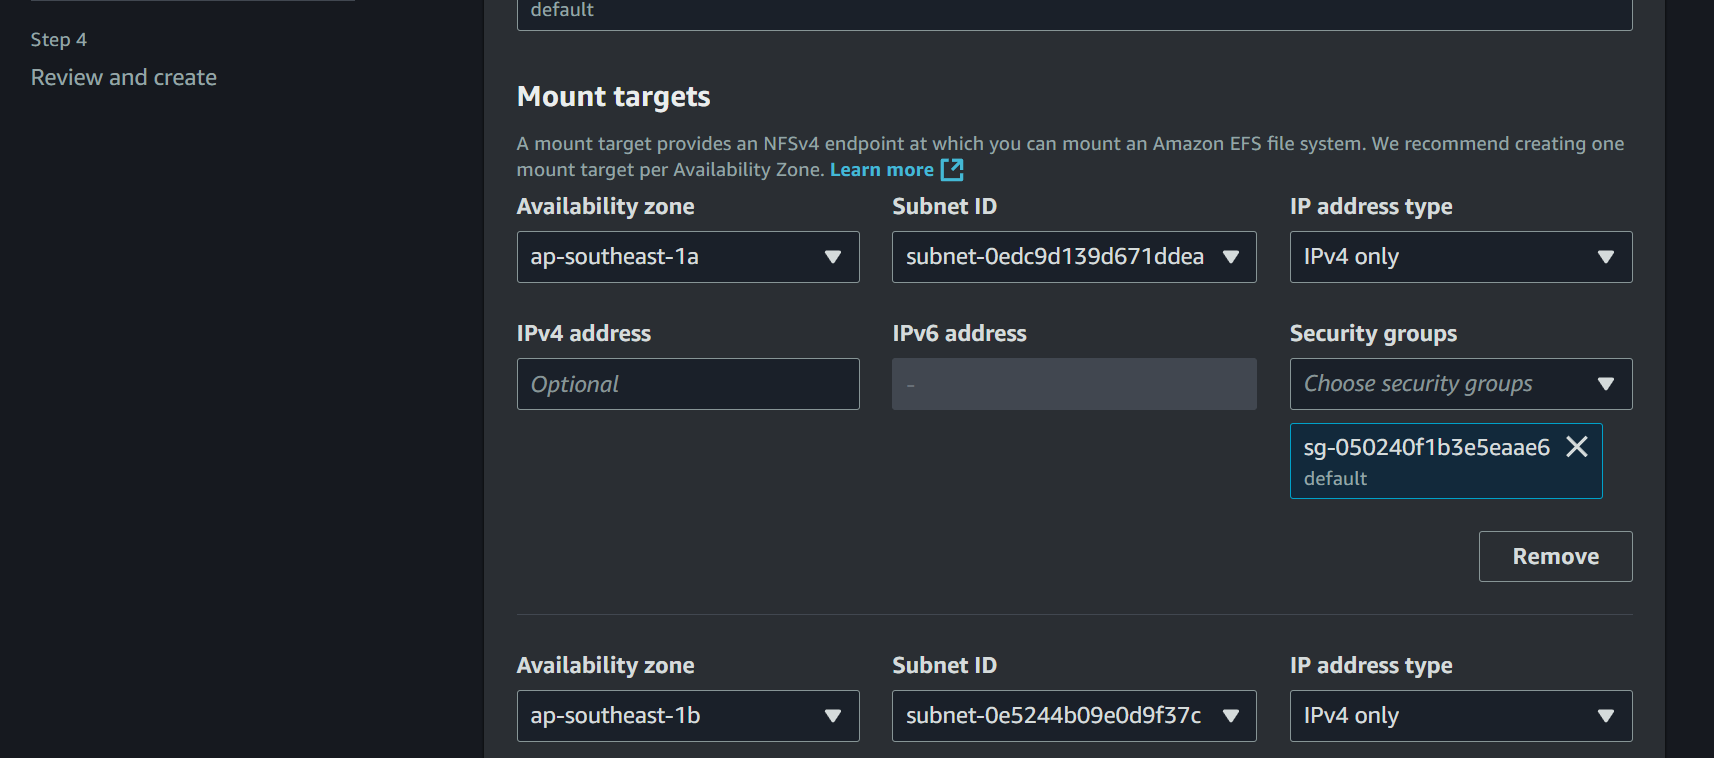
Configure Network Access
- VPC: Select your ECS cluster's VPC
- Mount targets: Select subnets where your ECS tasks run
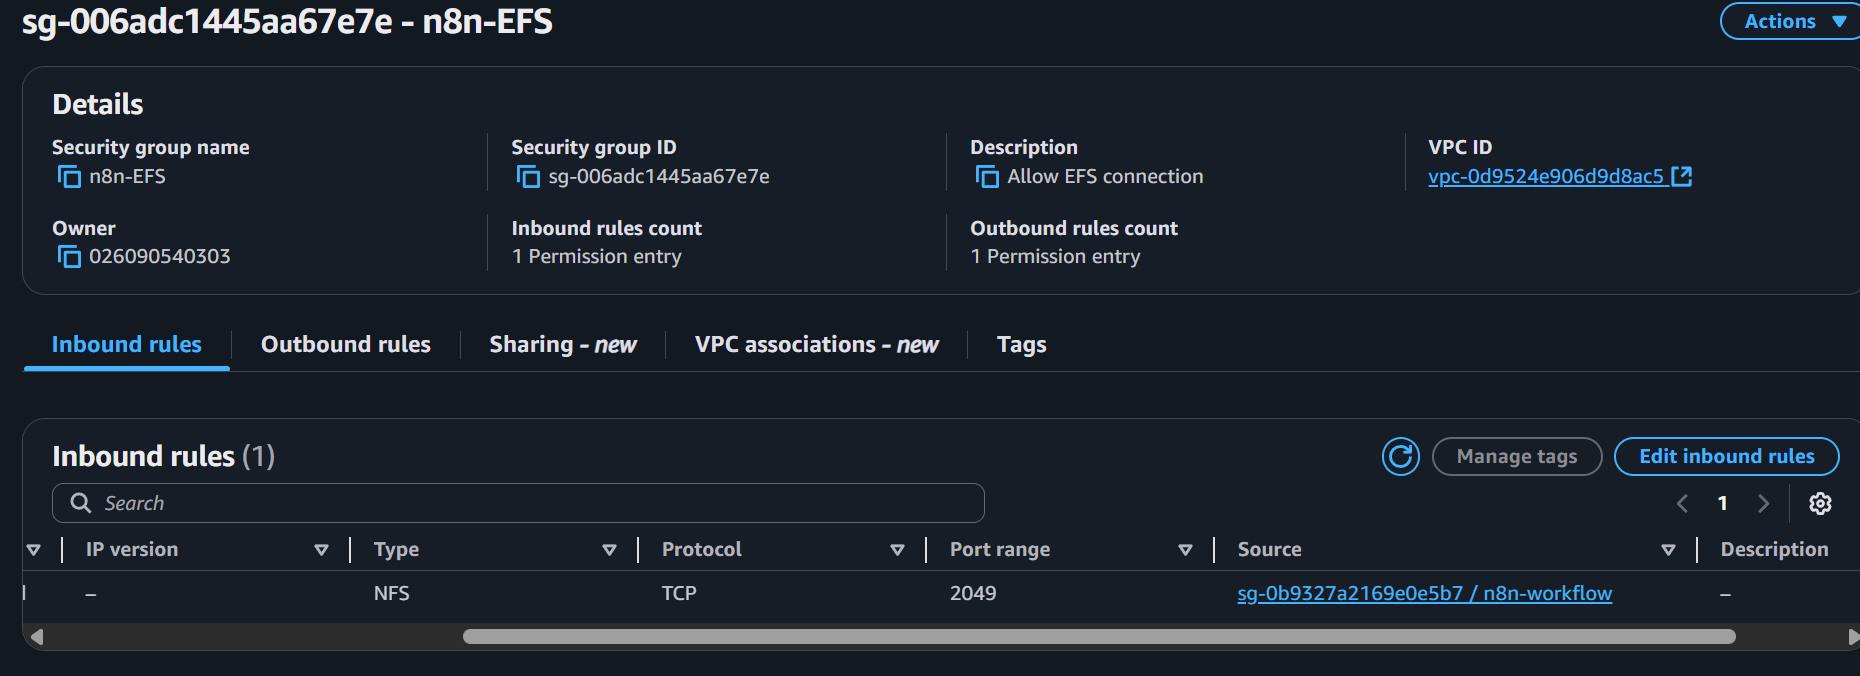
- Security groups: Create or select a security group with:
- Inbound rule for security group: NFS (port 2049) from your ECS security group
- Back to EFS and click Next → Next → Create
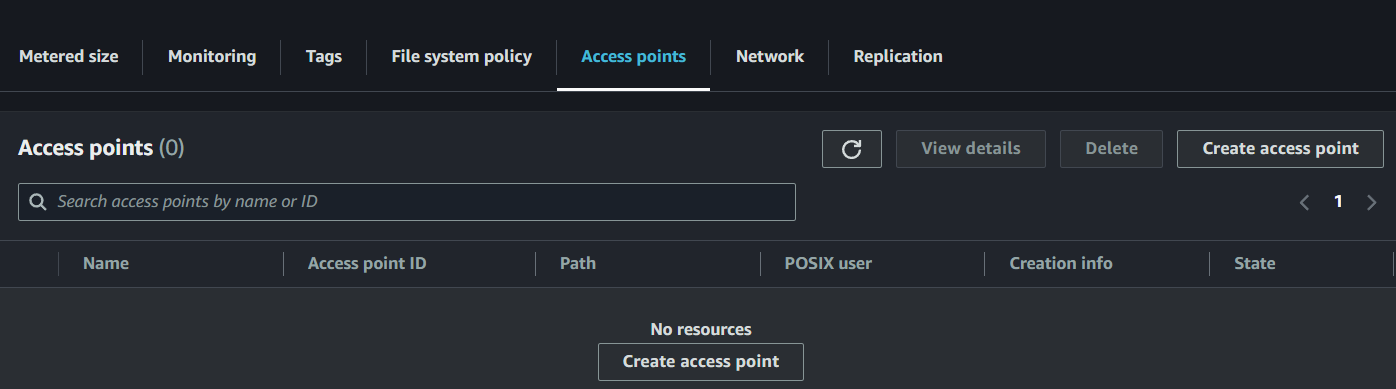
Create Access Point
- In your EFS file system, go to Access points tab
- Click Create access point
- Input Name:
n8n-access-point - Root directory path:
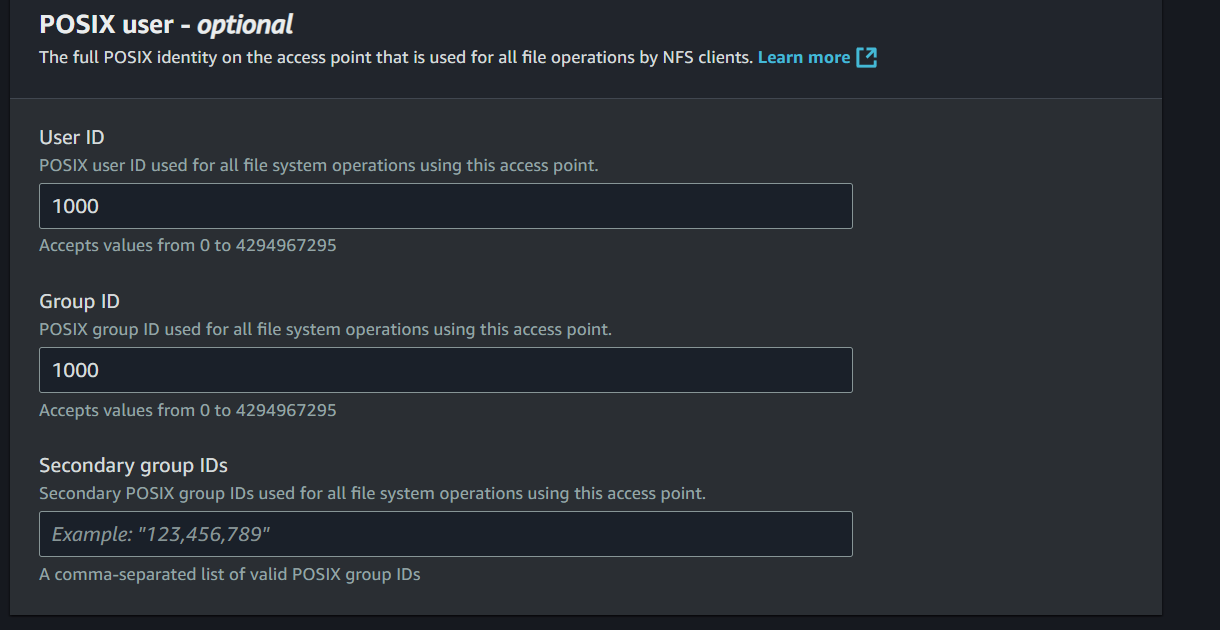
/n8n-data - Root directory permission: Owner user ID:
1000, Owner group ID:1000, Permissions:755 - POSIX User ID:
1000, Group ID:1000 - Click Create access point

Update ECS Task Definition
Create a new version of the ECS task definition using the provided JSON configuration:
- Go to ECS service in AWS Console
- Select your ECS task definition
- Click Edit task definition
{
    "family": "n8n-task",
    "containerDefinitions": [
        {
            "cpu": 0,
            "environment": [
                {
                    "name": "GENERIC_TIMEZONE",
                    "value": "UTC"
                },
                {
                    "name": "N8N_HOST",
                    "value": "0.0.0.0"
                },
                {
                    "name": "N8N_SECURE_COOKIE",
                    "value": "false"
                },
                {
                    "name": "N8N_PORT",
                    "value": "5678"
                },
                {
                    "name": "N8N_PROTOCOL",
                    "value": "http"
                }
            ],
            "essential": true,
            "image": "n8nio/n8n:latest",
            "logConfiguration": {
                "logDriver": "awslogs",
                "options": {
                    "awslogs-group": "/ecs/n8n",
                    "awslogs-create-group": "true",
                    "awslogs-region": "ap-southeast-1",
                    "awslogs-stream-prefix": "ecs"
                }
            },
            "mountPoints": [
                {
                    "sourceVolume": "n8n-data",
                    "containerPath": "/home/node/.n8n",
                    "readOnly": false
                }
            ],
            "name": "n8n",
            "portMappings": [
                {
                    "containerPort": 5678,
                    "hostPort": 5678,
                    "protocol": "tcp"
                }
            ],
            "systemControls": [],
            "volumesFrom": []
        }
    ],
    "taskRoleArn": "arn:aws:iam::your-account-id:role/ecsTaskRole",
    "executionRoleArn": "arn:aws:iam::your-account-id:role/ecsTaskExecutionRole",
    "networkMode": "bridge",
    "volumes": [
        {
            "name": "n8n-data",
            "efsVolumeConfiguration": {
                "fileSystemId": "fs-xxxxxxxxx",
                "transitEncryption": "ENABLED",
                "authorizationConfig": {
                    "accessPointId": "fsap-xxxxxxxxx"
                }
            }
        }
    ],
    "placementConstraints": [],
    "requiresCompatibilities": [
        "EC2"
    ],
    "cpu": "512",
    "memory": "756"
}
- Replace the placeholder IDs
fs-xxxxxxxxx→ Your EFS file system ID (e.g.,fs-0123456789abcdef0) - Replace the placeholder IDs
fsap-xxxxxxxxx→ Your access point ID (e.g.,fsap-0123456789abcdef0)
The EFS will now provide persistent storage for n8n workflows across container restarts.
4. Setup of Aurora RDS as Vector Store
Follow these steps to configure an Amazon Aurora Serverless v2 PostgreSQL database as a vector store in the AWS Console:
Database Engine Option
- Go to AWS Console → Services → RDS
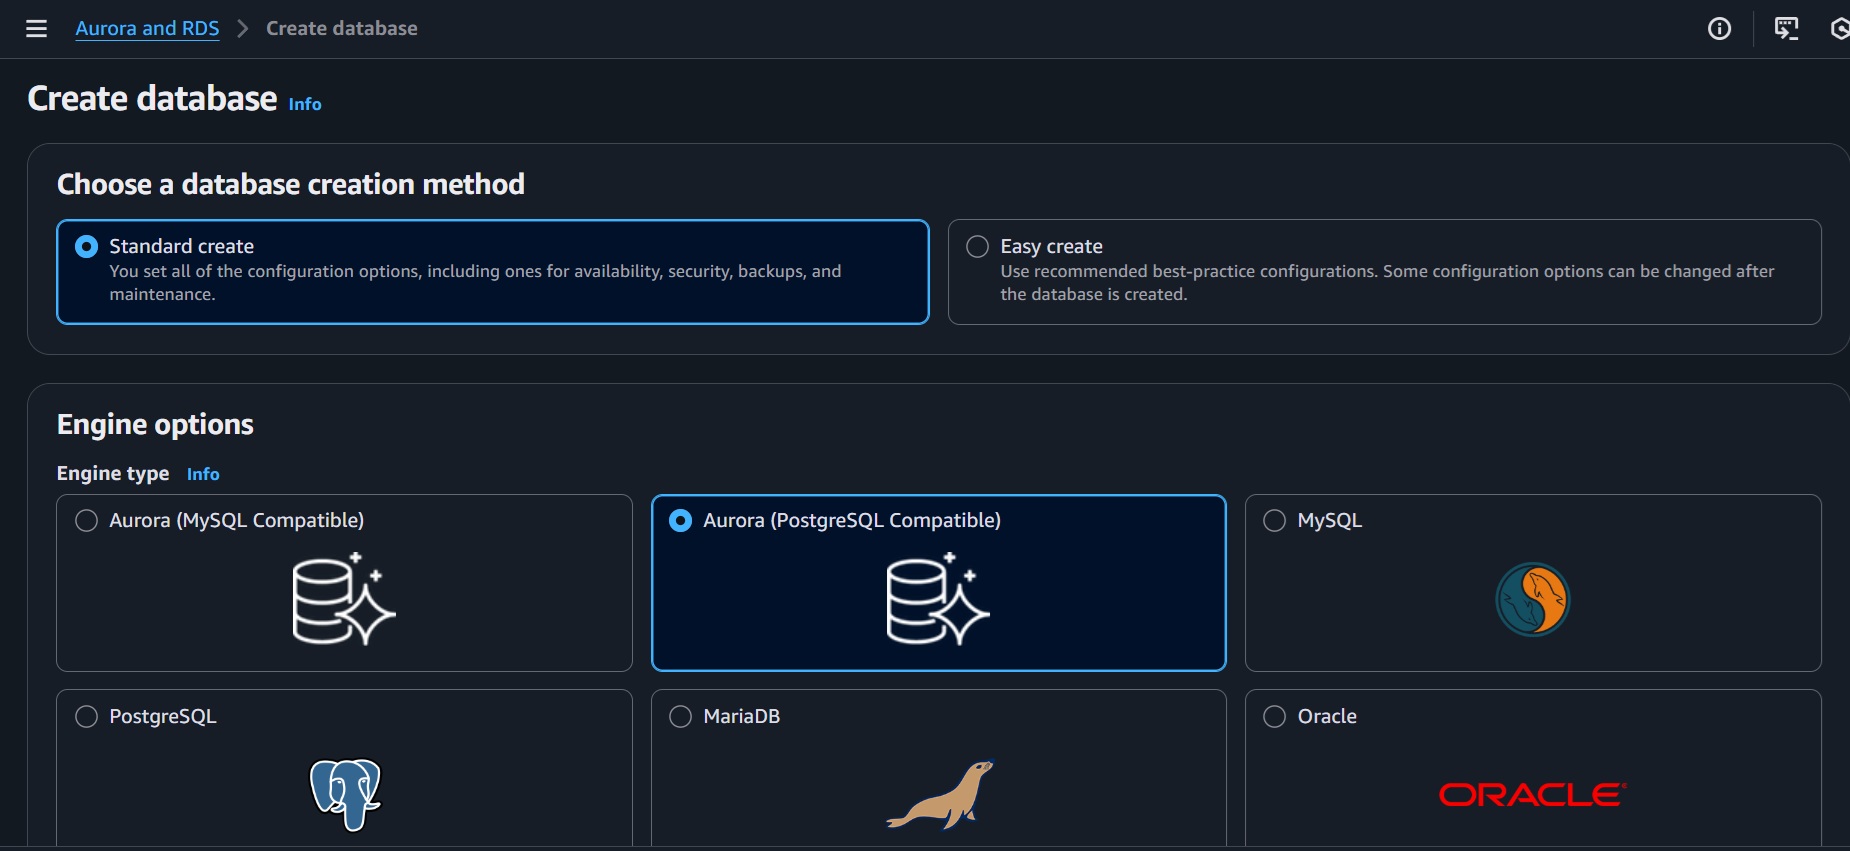
- Click "Create database"
- Select "Standard create"
- Engine type: "Amazon Aurora"
- Edition: "Amazon Aurora PostgreSQL-Compatible Edition"
- Engine version: Select latest PostgreSQL version
- Select "Production" or "Dev/Test" based on your needs
Database Configuration
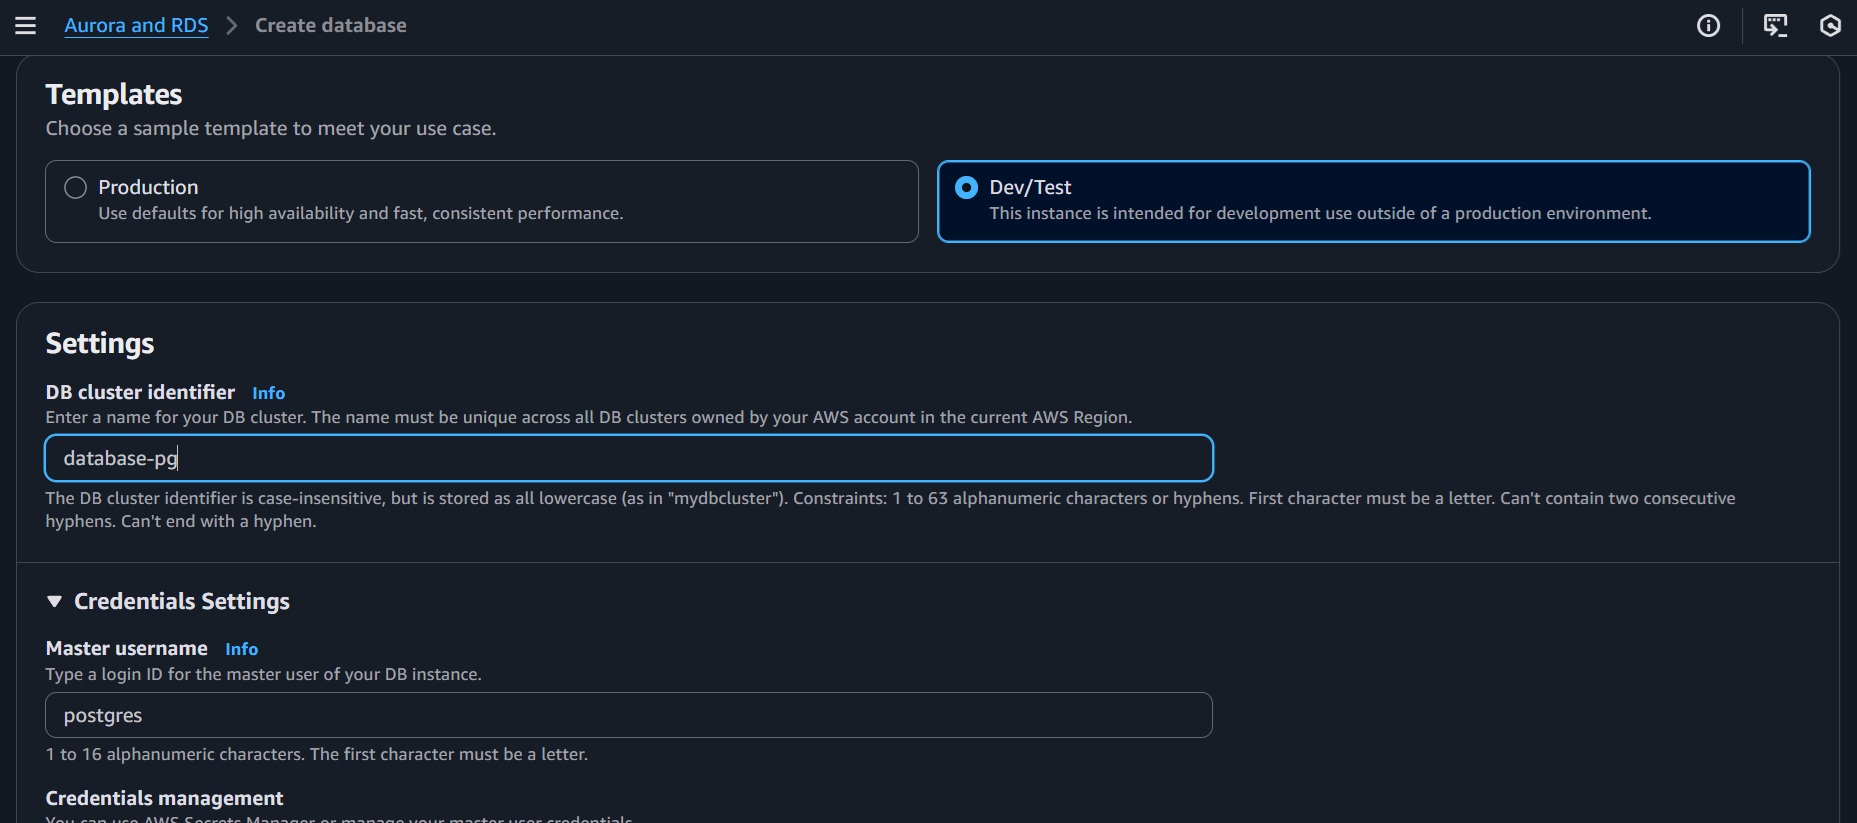
- DB cluster identifier:
database-pg - Use "Self Managed" credential management
- Master username:
postgres(default) - Master password: Set a strong password or use auto-generate
- DB instance class: Select "Serverless v2"
- Capacity settings:
- Minimum ACUs: 0.5 (lowest cost)
- Maximum ACUs: 1-128 (adjust based on expected load)

Connectivity
- VPC: Same VPC as your ECS cluster
- Subnet group: Create new or use existing
- Public access: No (recommended for security)
- VPC security groups: Create new or select existing
- Allow inbound PostgreSQL (port 5432) from your ECS security group

Additional Configuration
- Backup retention: 7 days (adjust as needed)
- Monitoring: Enable Performance Insights (optional)
- Click Create Database and wait for around 2 mins until the creation finish.
Create PG Vector Extension
Access the PostgreSQL database using an SQL client like pgAdmin. Execute the following SQL commands to enable the PGVector extension and create the table for embeddings:
CREATE EXTENSION IF NOT EXISTS vector;

SELECT extversion FROM pg_extension WHERE extname='vector';

CREATE SCHEMA n8n_integration;

CREATE ROLE n8n_user WITH PASSWORD 'your_own_password' LOGIN;

CREATE TABLE n8n_integration.my_kb (id uuid PRIMARY KEY DEFAULT gen_random_uuid(), embedding vector(1024), text text, metadata jsonb);

GRANT ALL PRIVILEGES ON TABLE n8n_integration.my_kb TO n8n_user;
5. Create Document Bucket and Setup of SNS Topic
This section configures an Amazon S3 bucket for temporary document storage and an SNS topic to notify the n8n workflow, triggering document transformation into embeddings for insertion into the PostgreSQL vector database.
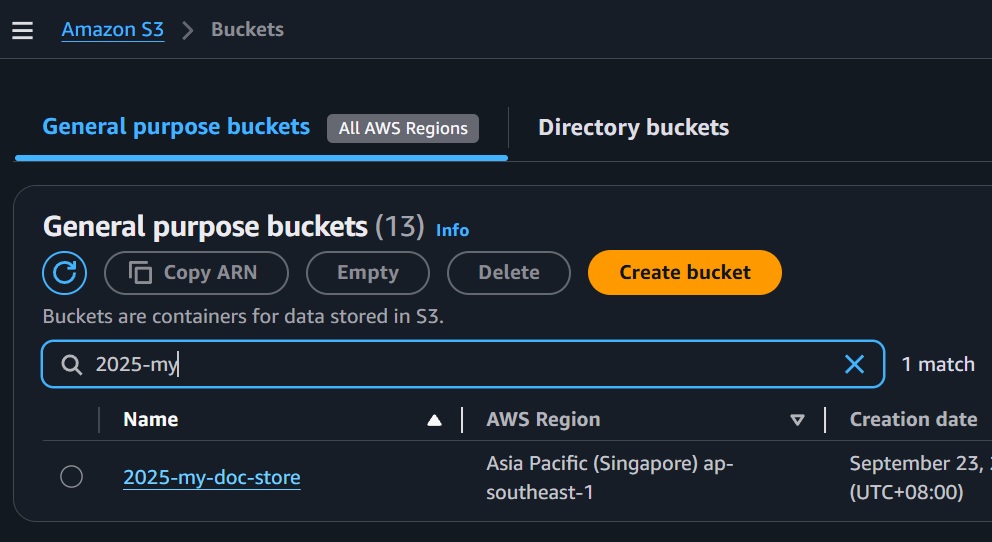
Create S3 Bucket
- Go to AWS Console > S3 > Create Bucket.
- Select "General Purpose" type of bucket
- Bucket Name: e.g.,
2025-my-doc-store.
Create SNS Topic
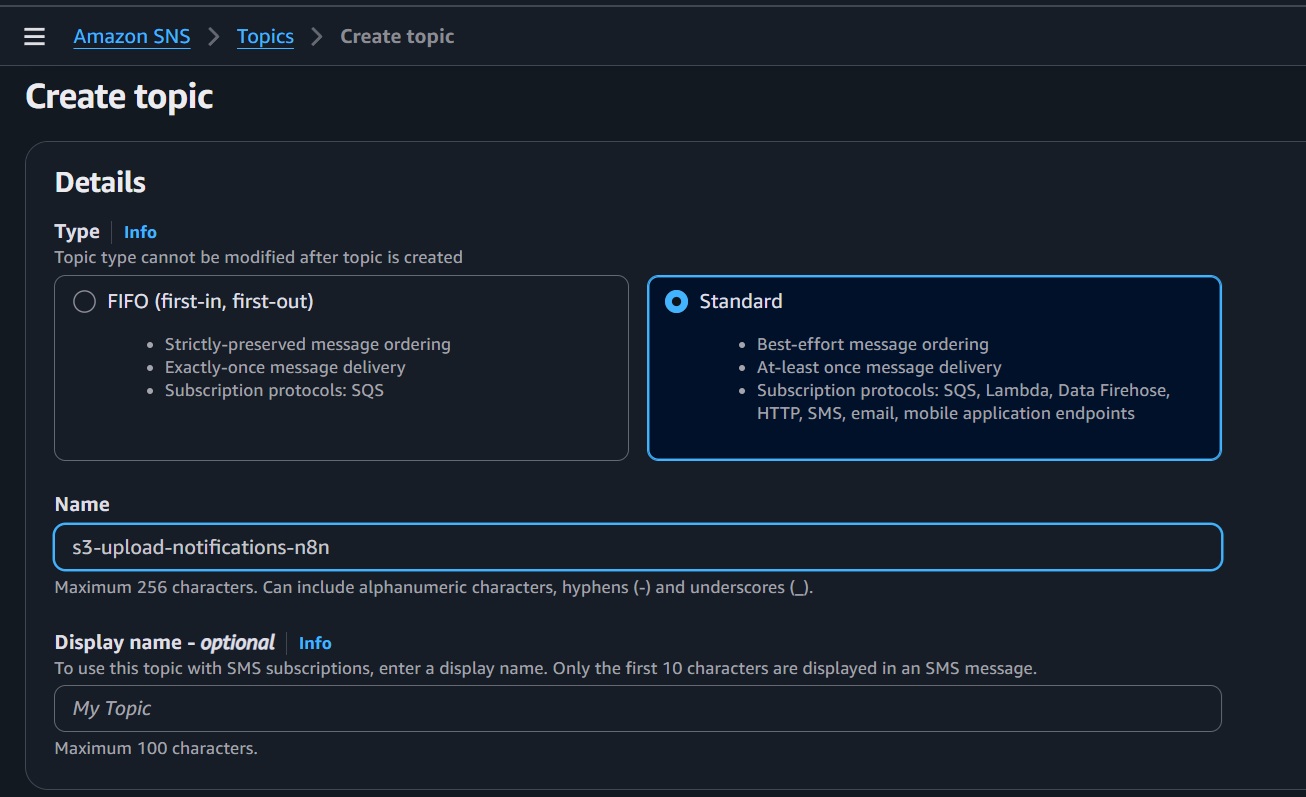
- Go to AWS Console > SNS > Topics > Create topic.
- Name: e.g.,
s3-upload-notifications-n8n. - Note the Topic ARN.
Set SNS Permissions
- In SNS Topic > Access policy > Ensure the policy allows
sns:Publishfrom your AWS account or S3 service if triggered by S3 events. - Example policy:
{
  "Version": "2008-10-17",
  "Statement": [
    {
       "Effect": "Allow",
       "Principal": "*",
       "Action": "SNS:Publish",
       "Resource":"arn:aws:sns:region:account-id:s3-upload-notifications-n8n",
       "Condition": {
           "StringEquals": {
           "aws:SourceAccount": "your-account-id"
           },
           "ArnEquals": {
           "aws:SourceArn": "arn:aws:s3:::your-bucket-name"
           }
       }
    }
  ]
}
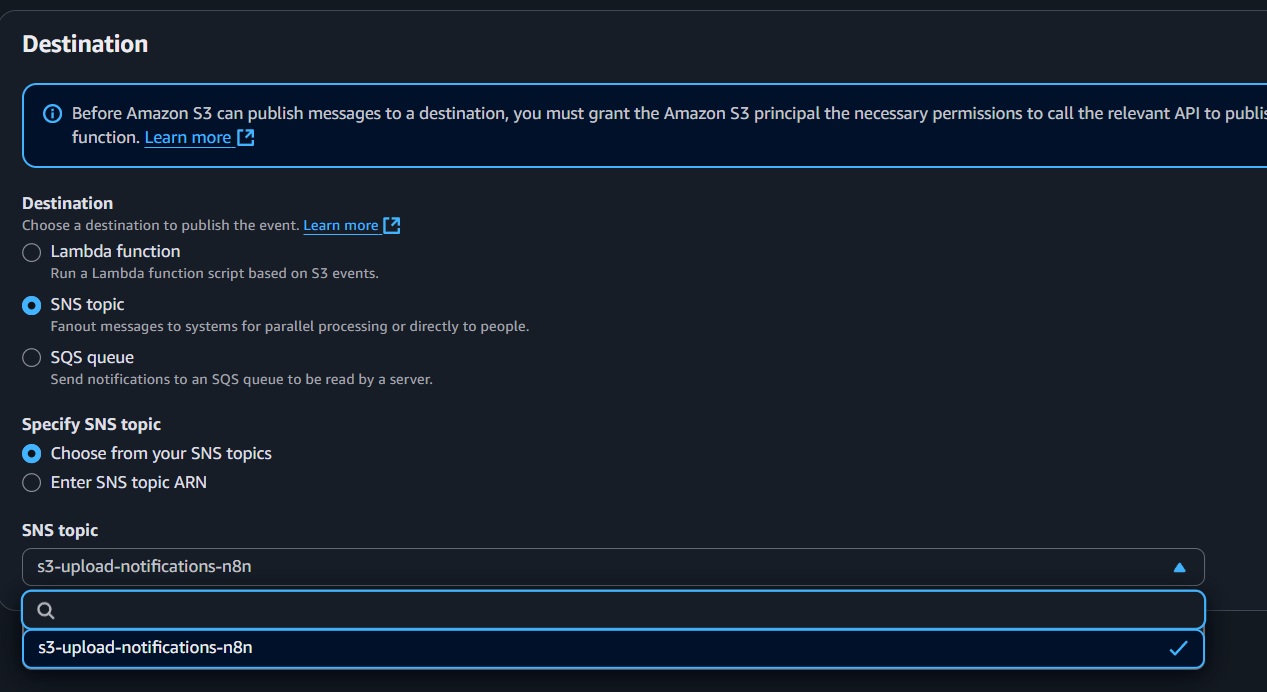
Create S3 Bucket Event Notification and Link SNS Topic
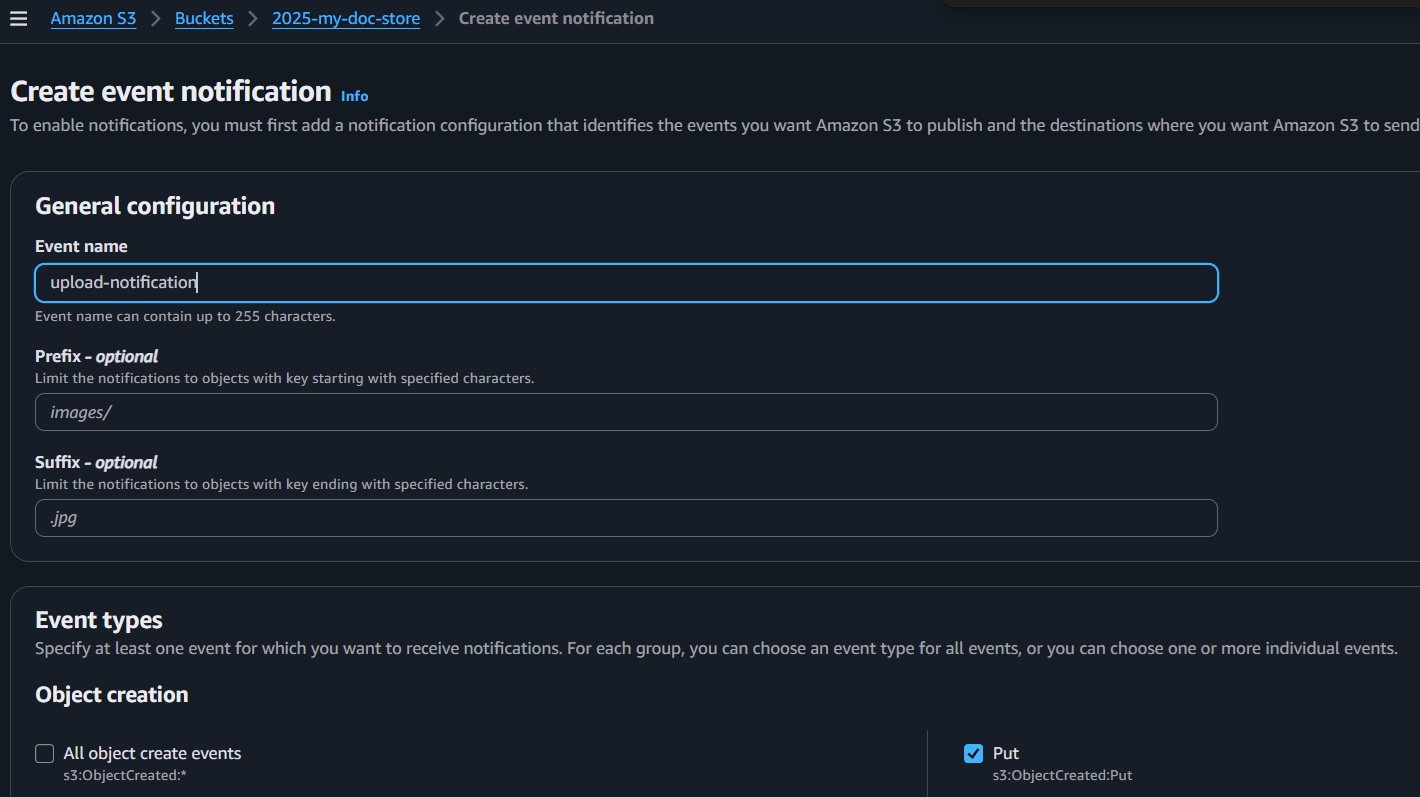
- Navigate to your previously created S3 bucket.
- Select the "Properties" tab.
- Click "Create event notification."
- Name:
upload-notification - Event type: Select "All object create events" (or specifically Put).
- Destination: Choose "SNS Topic."
- Select the SNS topic created earlier (e.g.,
s3-upload-notifications-n8n).
n8n Steps to create SNS Trigger
In your browser, access the n8n console to create a workflow that listens to the SNS topic:
- Create a new workflow named
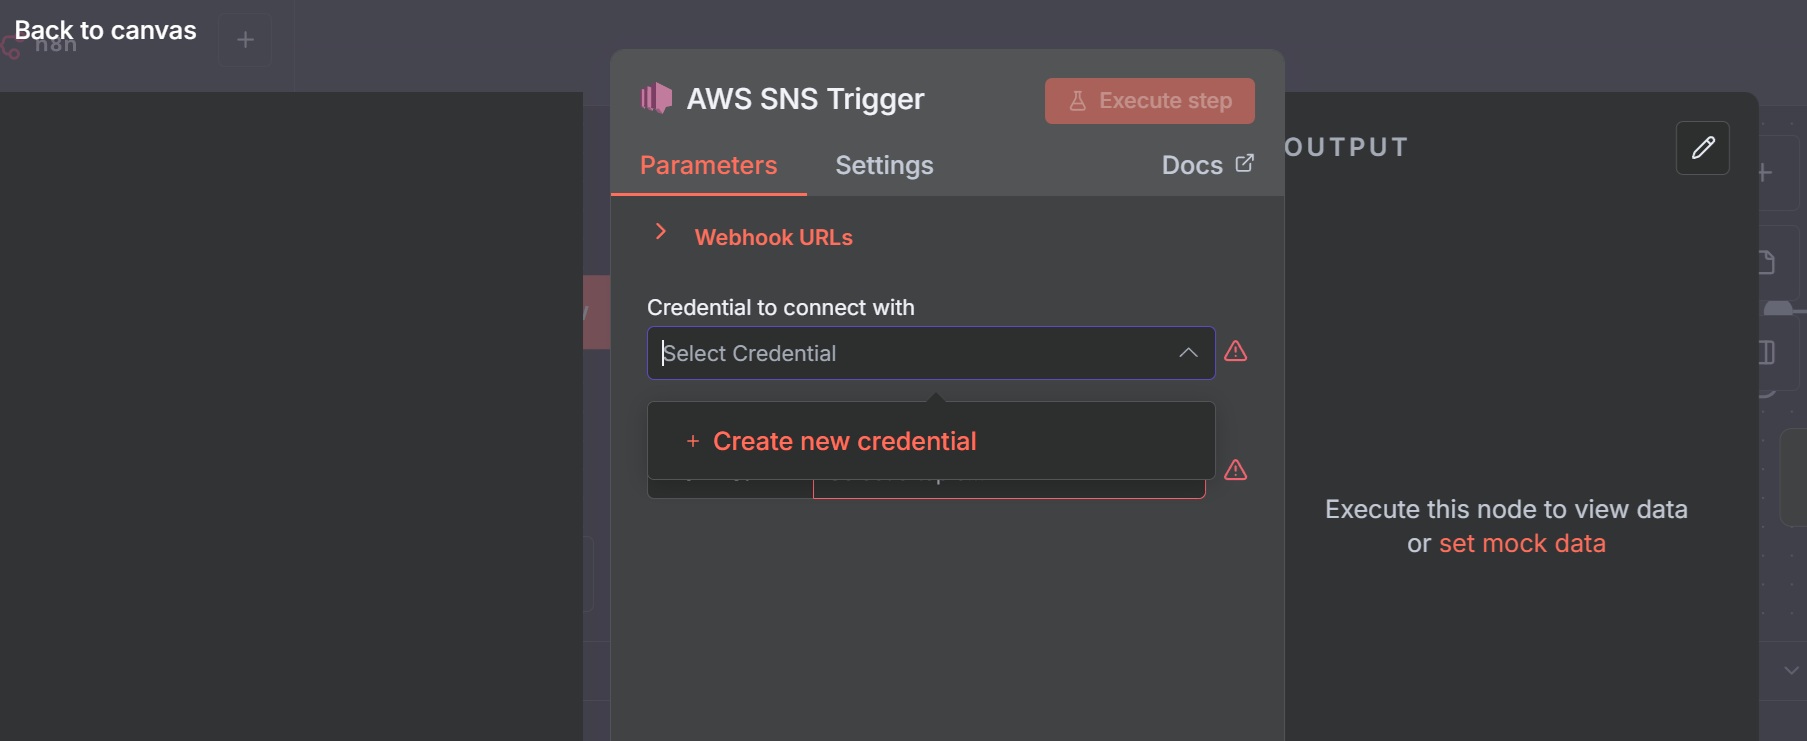
Load Document. - Add an "AWS SNS Trigger" node.
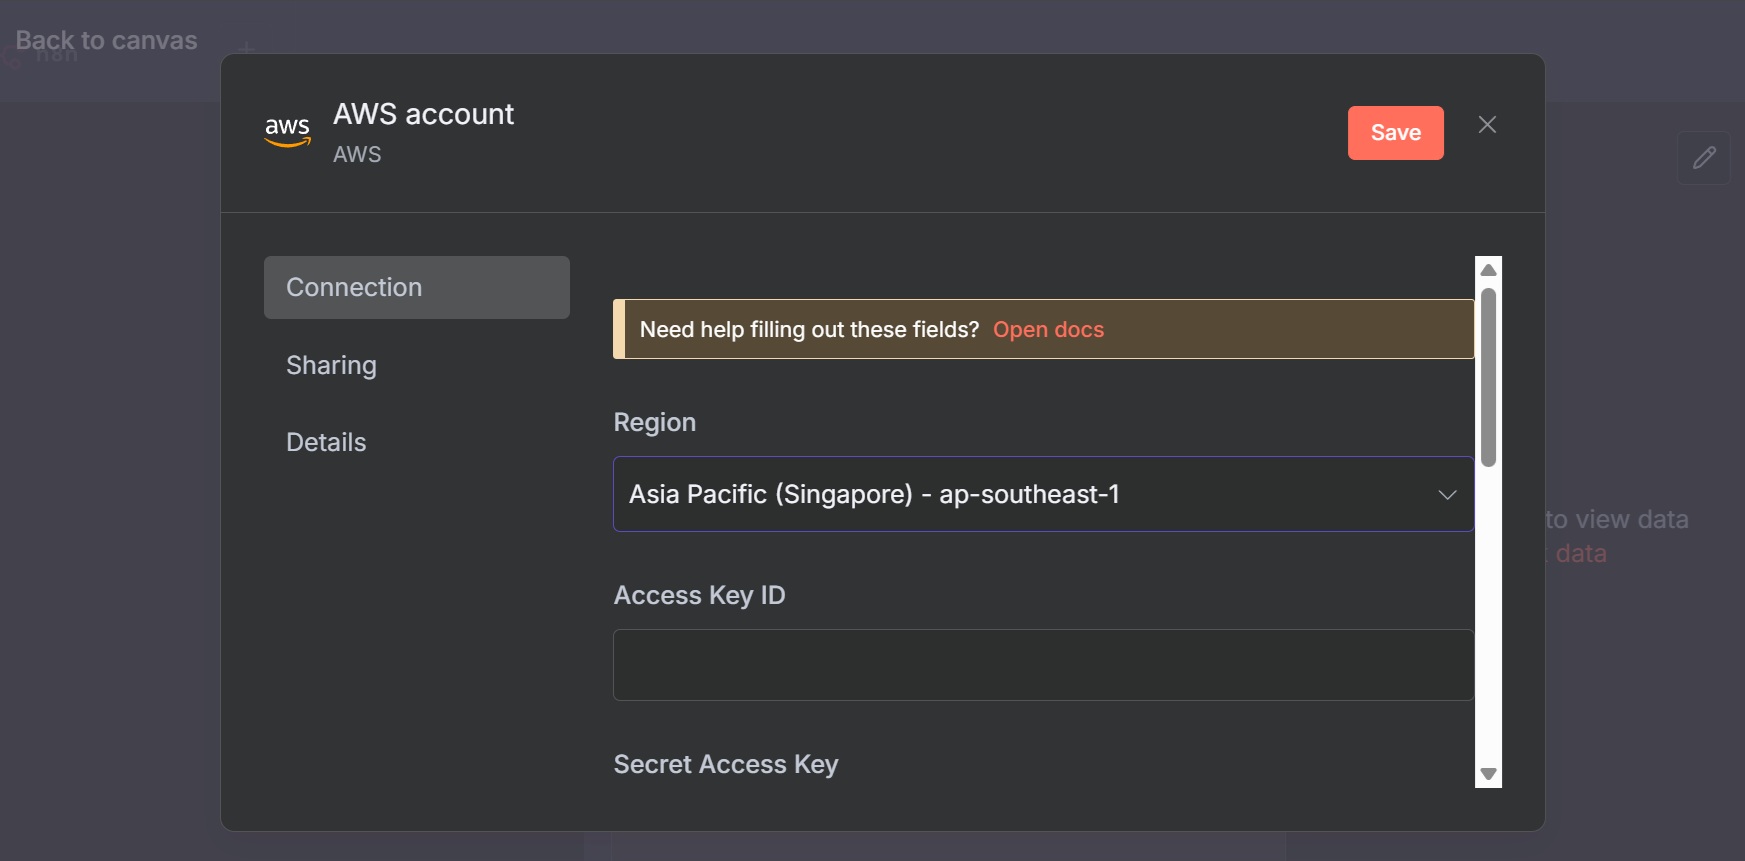
- Configure credentials: Select or create AWS credentials with an access key and secret key. Ensure the IAM user has
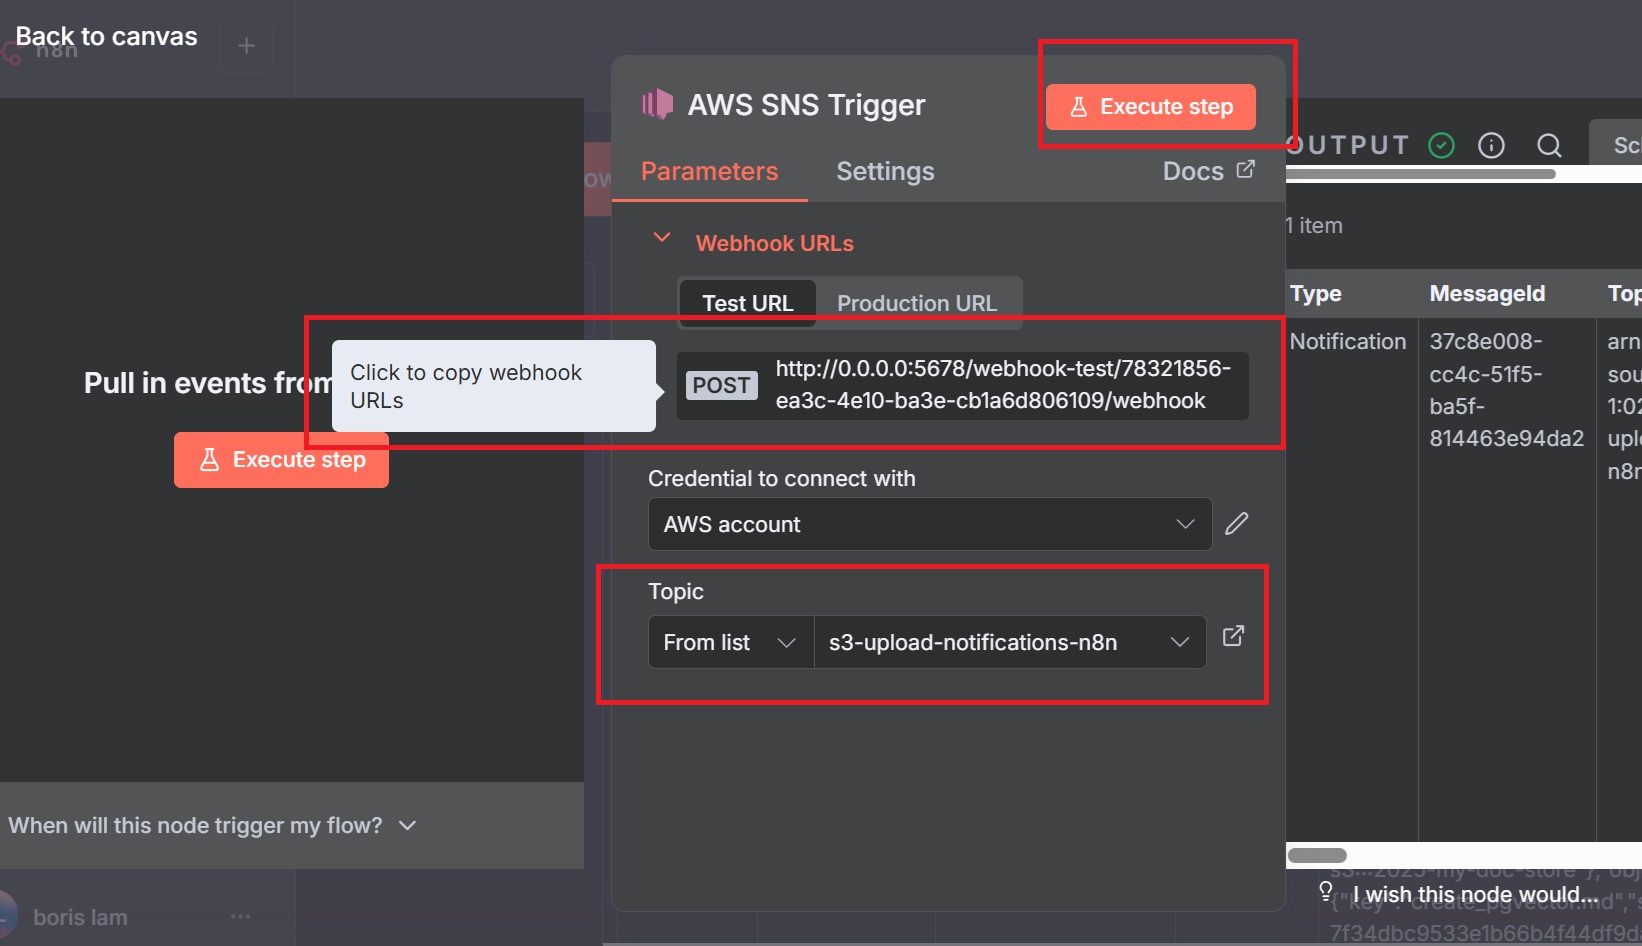
sns:Subscribeandsns:Receivepermissions. - Copy the webhook URL from the node settings for the SNS subscription.
Create Subscription
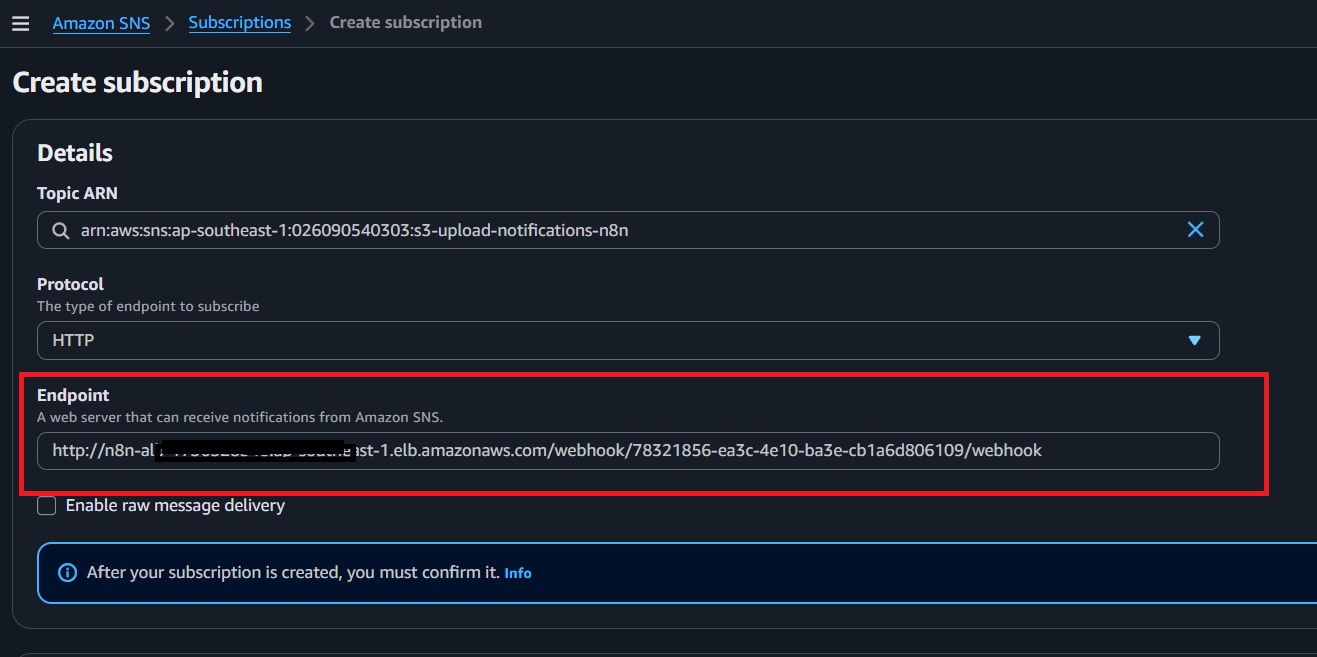
Return to the AWS Console to create a subscription using the n8n webhook URL:
- Navigate to SNS > Subscriptions > Create subscription.
- Select the Topic ARN from the earlier step.
- Protocol: Choose
HTTPS(orHTTP, depending on your setup). - Endpoint: Paste the n8n webhook URL from the previous step.
- Enable "Raw message delivery."
- Click "Create." The subscription will appear as "Pending Confirmation."
- In the Subscriptions list, select the subscription and click "Request confirmation."

Test Subscription
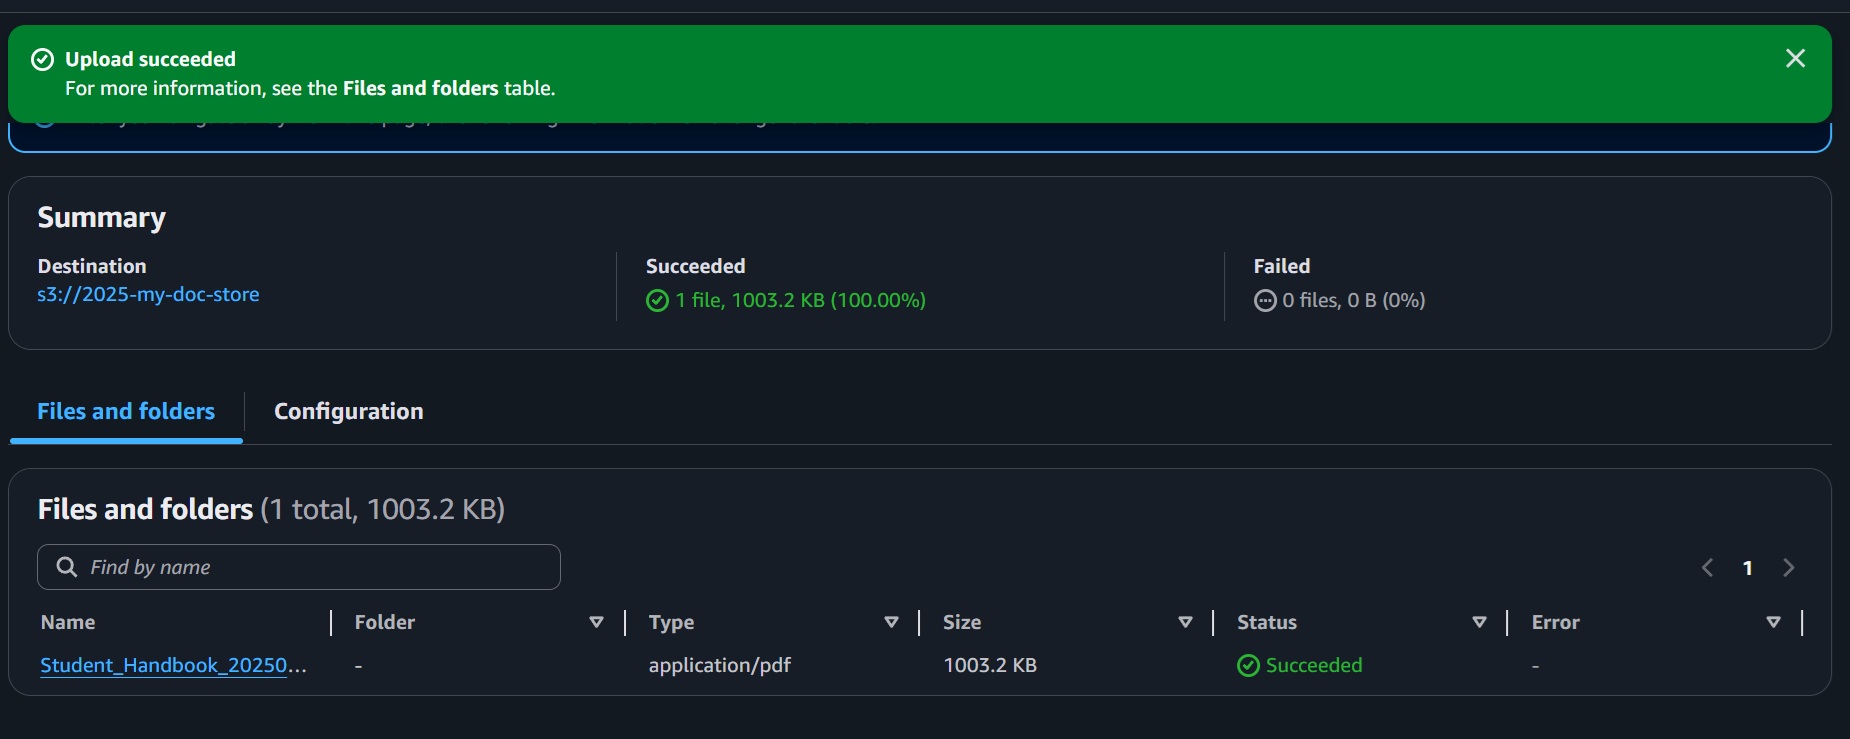
- In the n8n workflow, click "Execute Workflow" or activate the workflow.
- In the AWS S3 Console, upload a test file to the configured S3 bucket.
- Return to the n8n workflow to verify that it triggers when SNS receives the message.
6. Setup of Loading Document Workflow in n8n

This section outlines the creation of an n8n workflow to process and load documents into a PostgreSQL vector database with the PGVector extension. The workflow retrieves documents from an S3 bucket, extracts text, generates embeddings, and stores them for use in a Retrieval-Augmented Generation (RAG) system. Below are the nodes and their configurations:
Link for the test pdf file (Tung Wah College Student Handbook): Student Handbook
AWS S3 Download File Node:
The purpose is to fetch the uploaded file from S3 bucket.
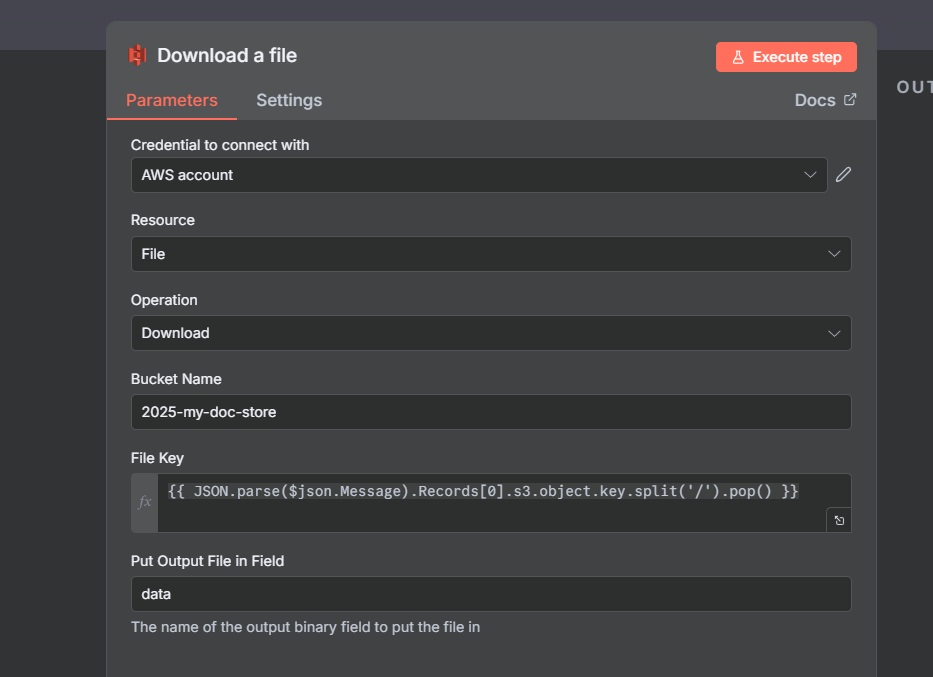
- AWS Credentials: Create or select AWS credentials with an access key and secret key (ensure the IAM user has
s3:GetObjectpermissions). - Operation: Download.
- Bucket: Specify the S3 bucket name (e.g.,
2025-my-doc-store). - File Key Expression:
{{ JSON.parse($json.Message).Records[0].s3.object.key.split('/').pop() }}
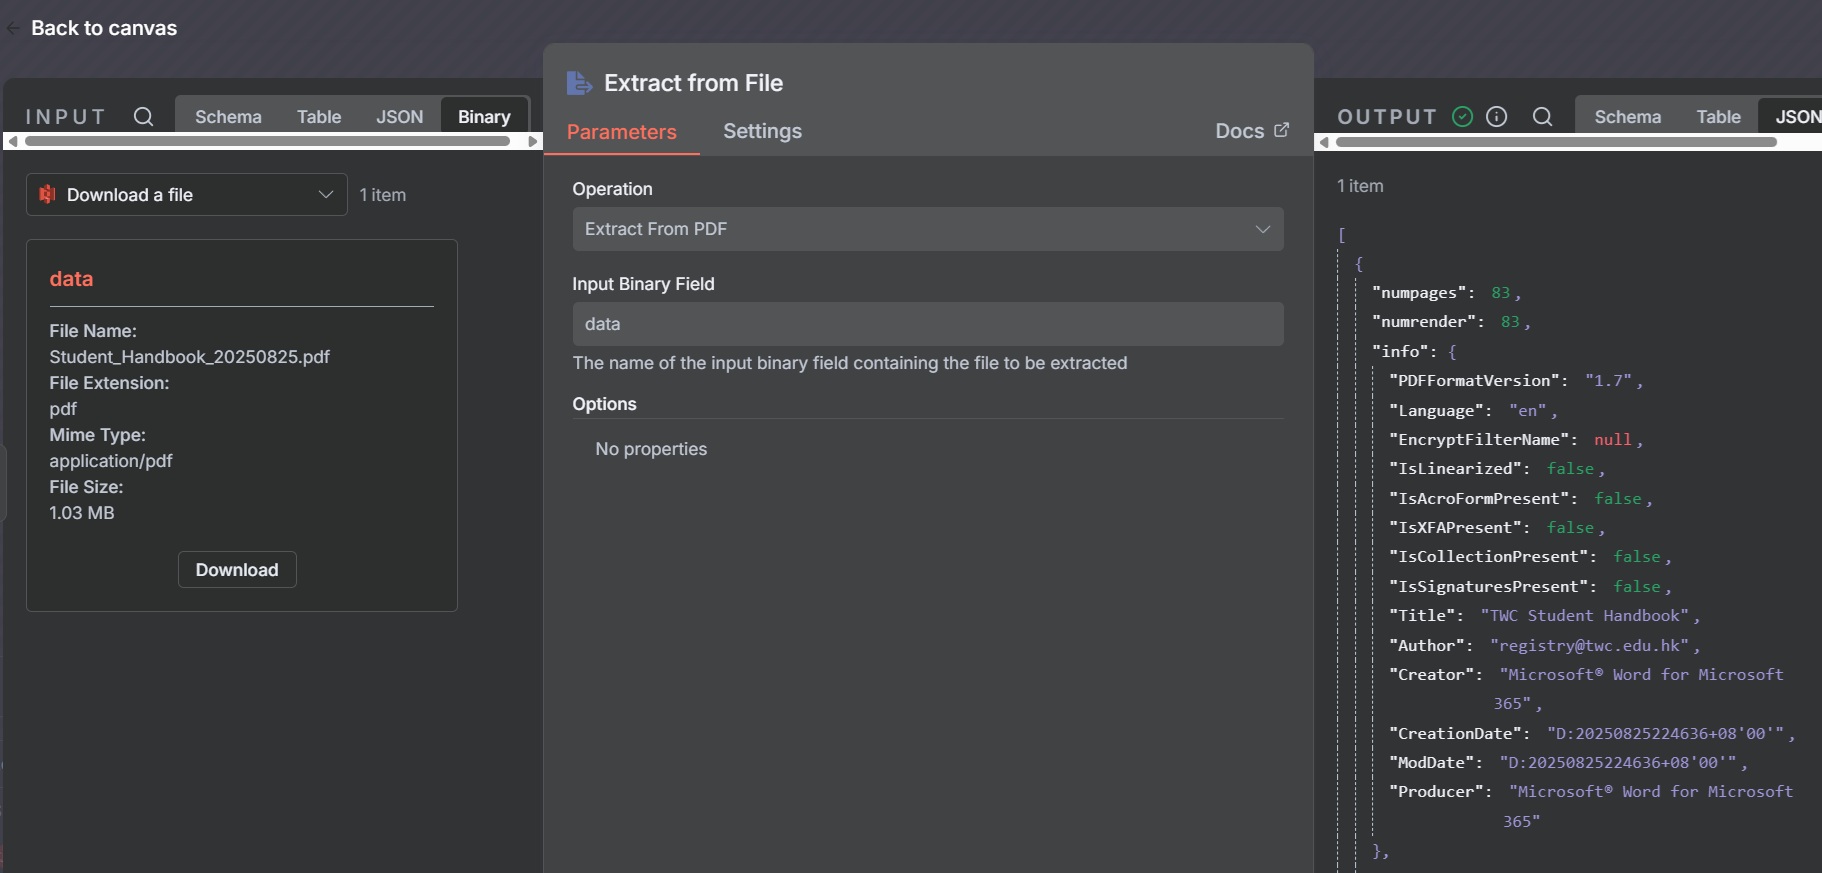
Extract File Node:
The purpose of this step is to extract text from the document, in this case, a PDF student handbook. Extracting text prior to embedding enhances RAG accuracy.
- Select "Extract from PDF"
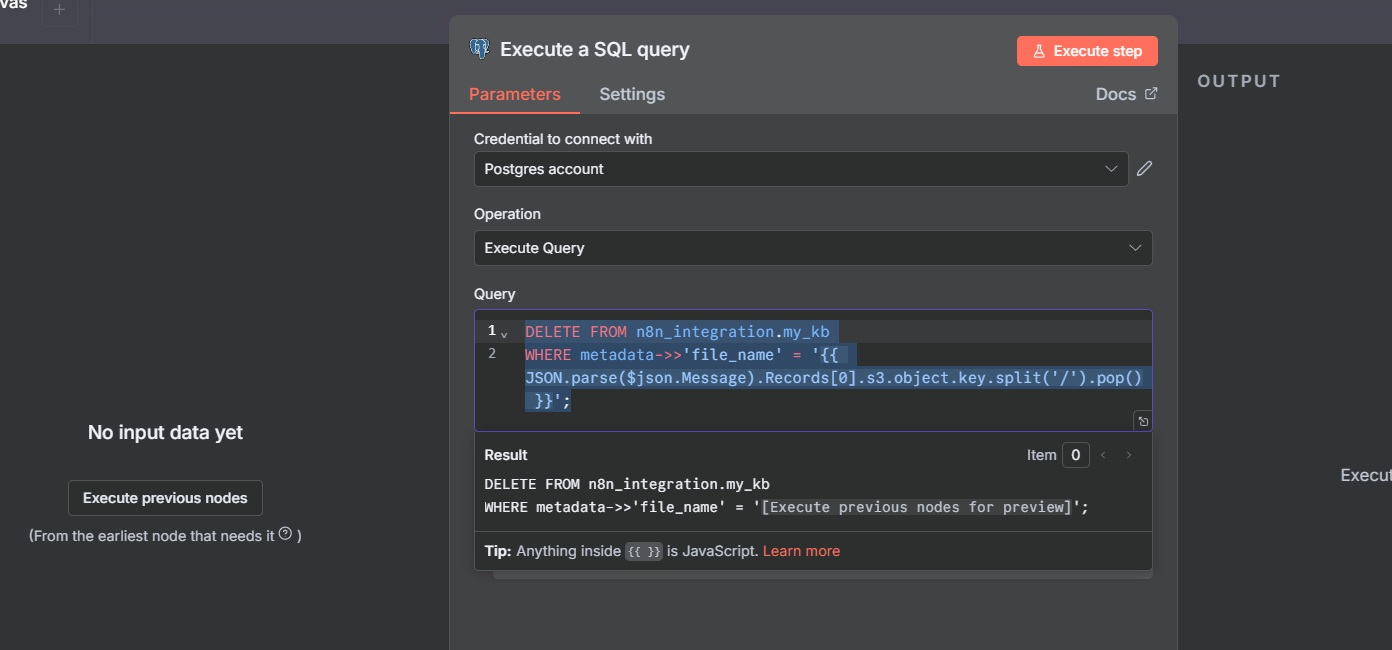
PostgreSQL Execute Query Node:
This step removes existing records of the same document to prevent duplicates in the vector database.
- PostgreSQL Credentials: Configure with the database credentials (e.g., host, port, username, password for the Aurora Serverless instance).
- Operation: Select "Execute Query."
- Query:
DELETE FROM n8n_integration.my_kb
WHERE metadata->>'file_name' = '{{ JSON.parse($json.Message).Records[0].s3.object.key.split('/').pop() }}';
Merge Node:
Combines outputs from the Extract File node and passes the text to subsequent nodes for processing.
- Mode: Select "Merge by Position" to ensure proper data flow.
- Output: Forward the extracted text and any relevant metadata.
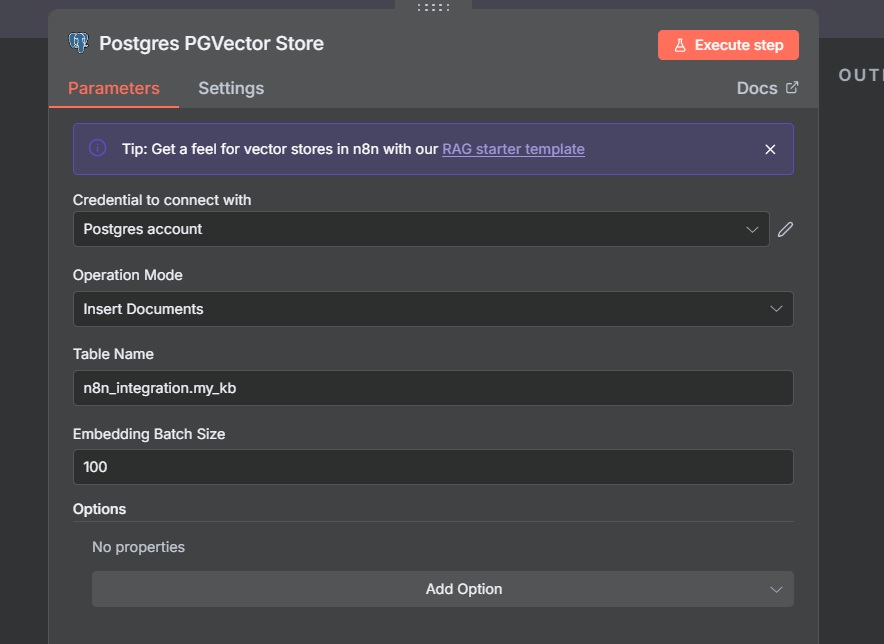
PostgreSQL PGVectorStore Node:
Inserts the text chunks and their embeddings into the vector database.
- Credentials: Use the same PostgreSQL credentials as the Execute Query node.
- Operation: Select "Insert Document."
- Table Name:
n8n_integration.my_kb - Columns:
text: Stores the chunked text.embedding: Stores the vector (ensure dimension matches Cohere’s output, e.g., 1024).metadata: Stores JSONB metadata (e.g.,file_name).
Embedding Model Node:
Generates embeddings for the text chunks using a Cohere model.
- Credentials: Configure Cohere credentials (you need to register and create API key in Cohere website).
- Model: Select
Cohere-embed-multilingual-v3.0(1024-dimensional).
Default Data Loader Node:
Prepares the chunked text and metadata for insertion into the vector database.
- Type of data: JSON
- Mode: Load all input data
- Add Metadata:
file_namefor traceability:
{{ { "file_name": JSON.parse($json.Message).Records[0].s3.object.key.split('/').pop() } }}
upload_date: {{ $now }}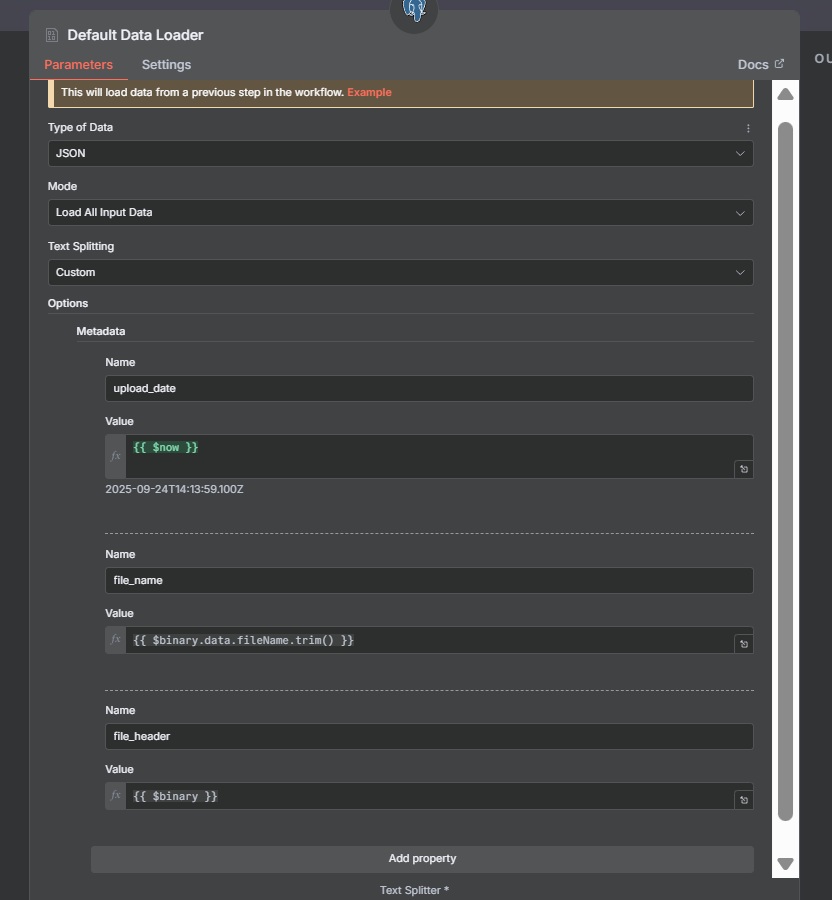
Token Splitter Node:
This node splits the extracted text into manageable chunks for embedding, optimizing vector storage and retrieval.
- Chunk Size: 1000 tokens.
- Chunk Overlap: 250 tokens to maintain context between chunks.
7. Setup of RAG Workflow in n8n
This section details the creation of an n8n workflow to implement a Retrieval-Augmented Generation (RAG) chatbot for answering queries about Tung Wah College using a PostgreSQL vector database.
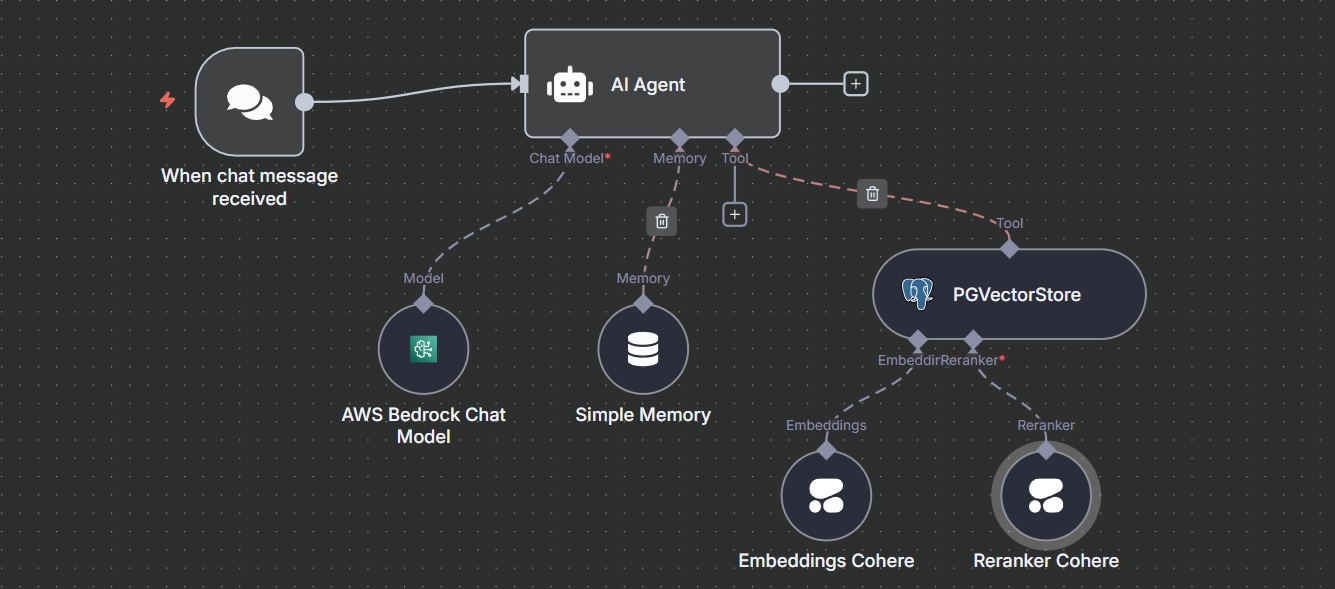
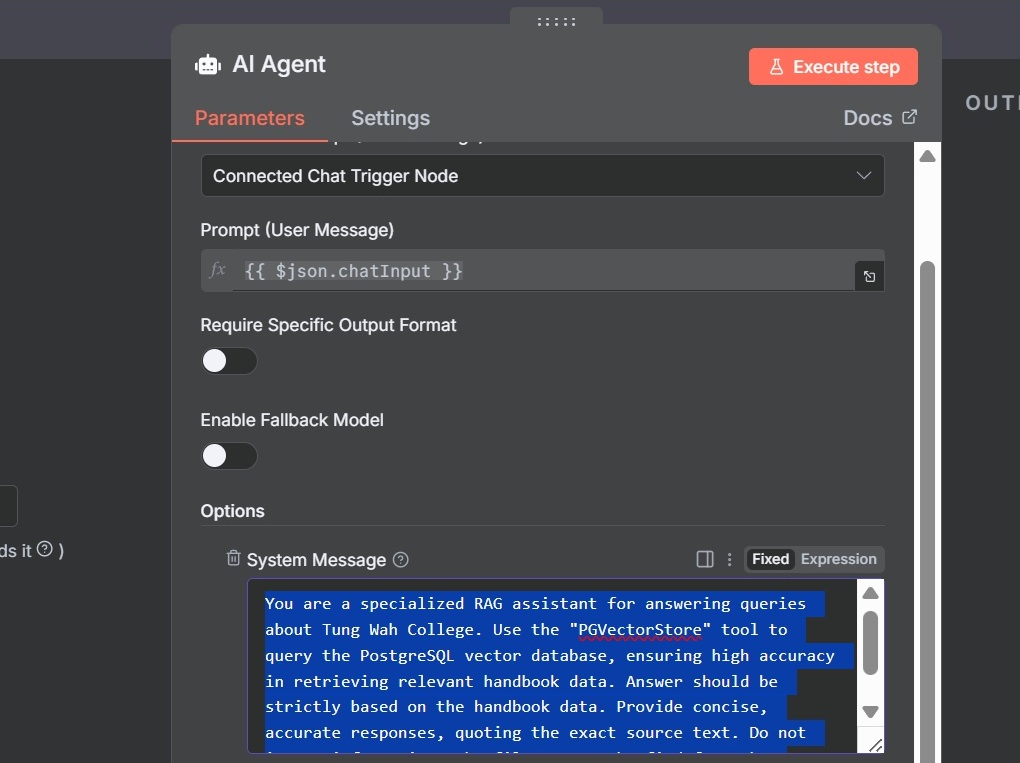
AI Agent Node:
Orchestrates the RAG process by integrating retrieval, reranking, and response generation.
- System Prompt:
You are a specialized RAG assistant for answering queries about Tung Wah College.
Use the "PGVectorStore" tool to query the PostgreSQL vector database, ensuring high accuracy in retrieving relevant handbook data.
Provide concise, accurate responses, quoting the exact source from the metadata (file_name). Do not invent information.
Simple Memory Node:
Stores conversation history to maintain context for follow-up queries.
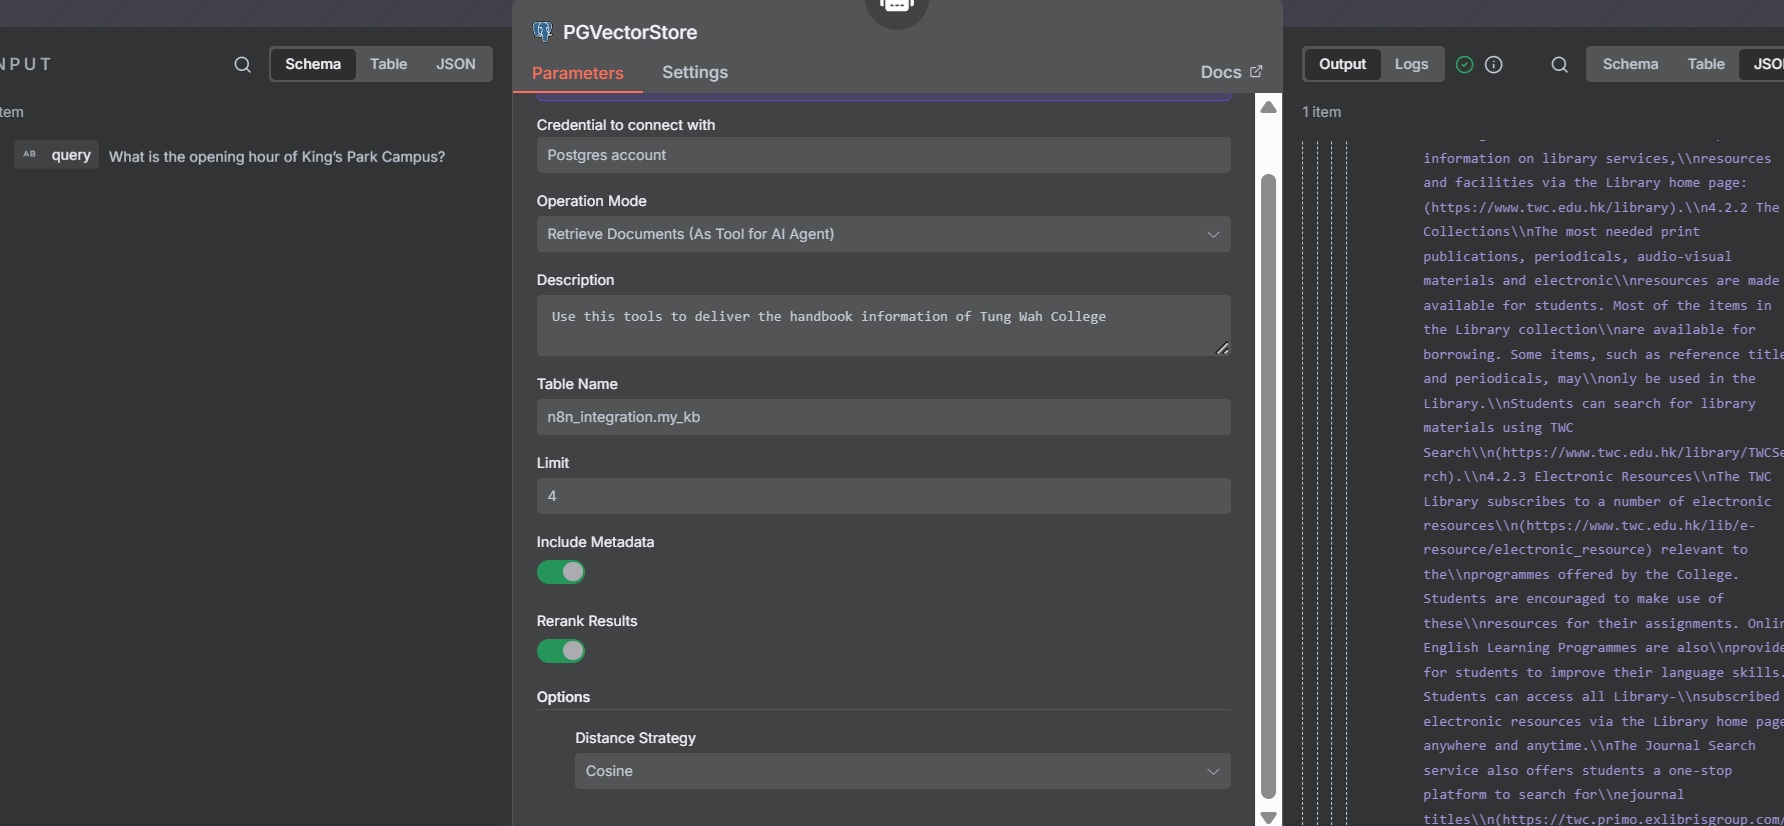
PGVectorStore Node:
Retrieves relevant documents from the PostgreSQL vector database as a tool for the AI agent.
- Credentials: Use PostgreSQL credentials for the Aurora Serverless instance.
- Operation: Select "Retrieve Document (As Tool for AI Agent)"
- Table Name:
n8n_integration.my_kb - Description: "Use this tool to retrieve handbook information for Tung Wah College."
- Enable "Include Metadata" to retrieve
file_nameand other metadata. - Enable "Rerank Results" to improve retrieval accuracy.
Embedding Cohere Node:
Generates embeddings for the user query to enable similarity search in the vector database.
- Credentials: Use the same Cohere credentials created before.
- Model: Select
Cohere-embed-multilingual-v3.0for multilingual
Reranker Cohere Node:
Reranks retrieved documents to prioritize the most relevant results.
- Credentials: Use the same Cohere credentials as the Embedding node.
- Model: Select
Cohere-rerank-multilingual-v3.0.
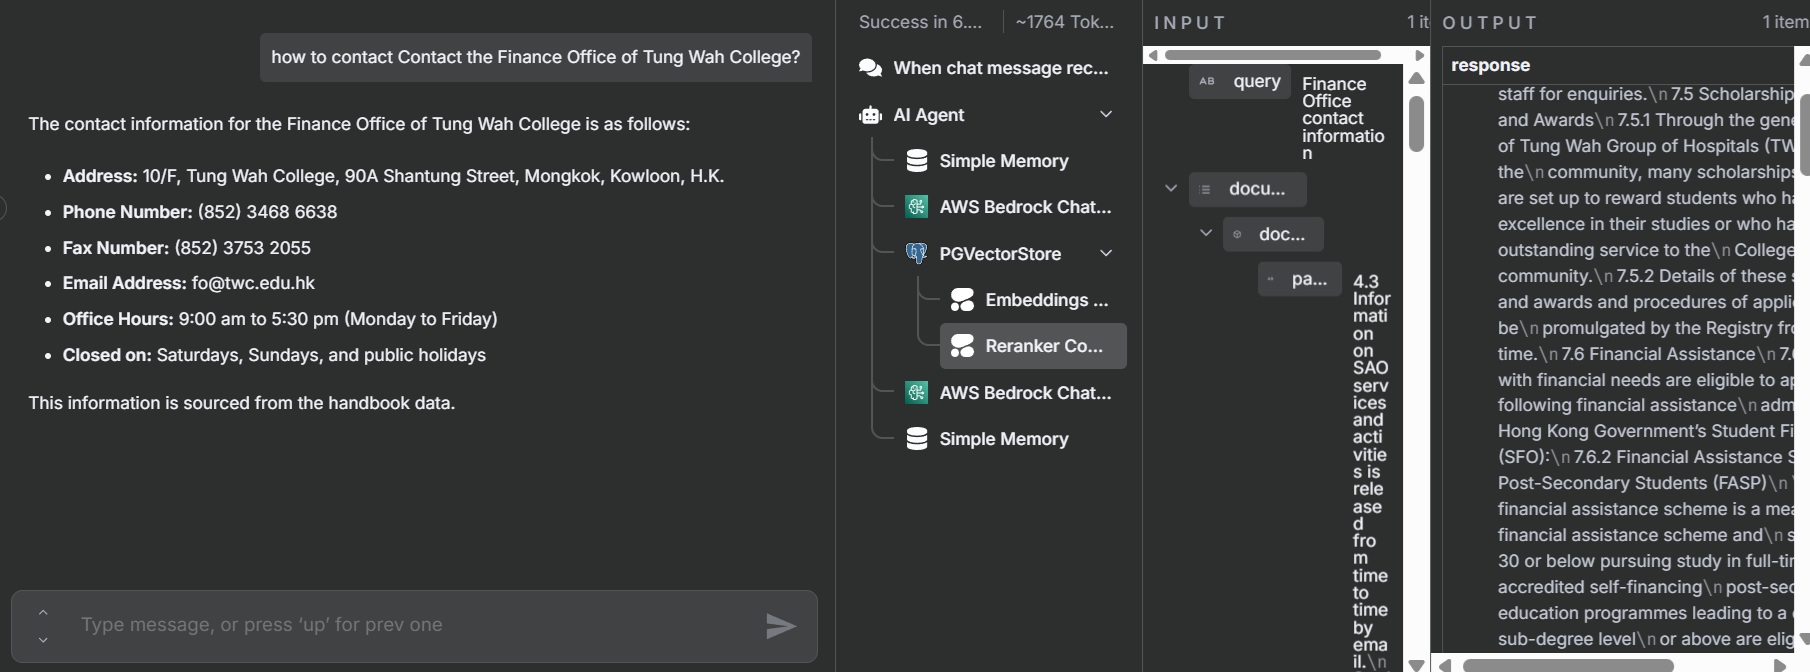
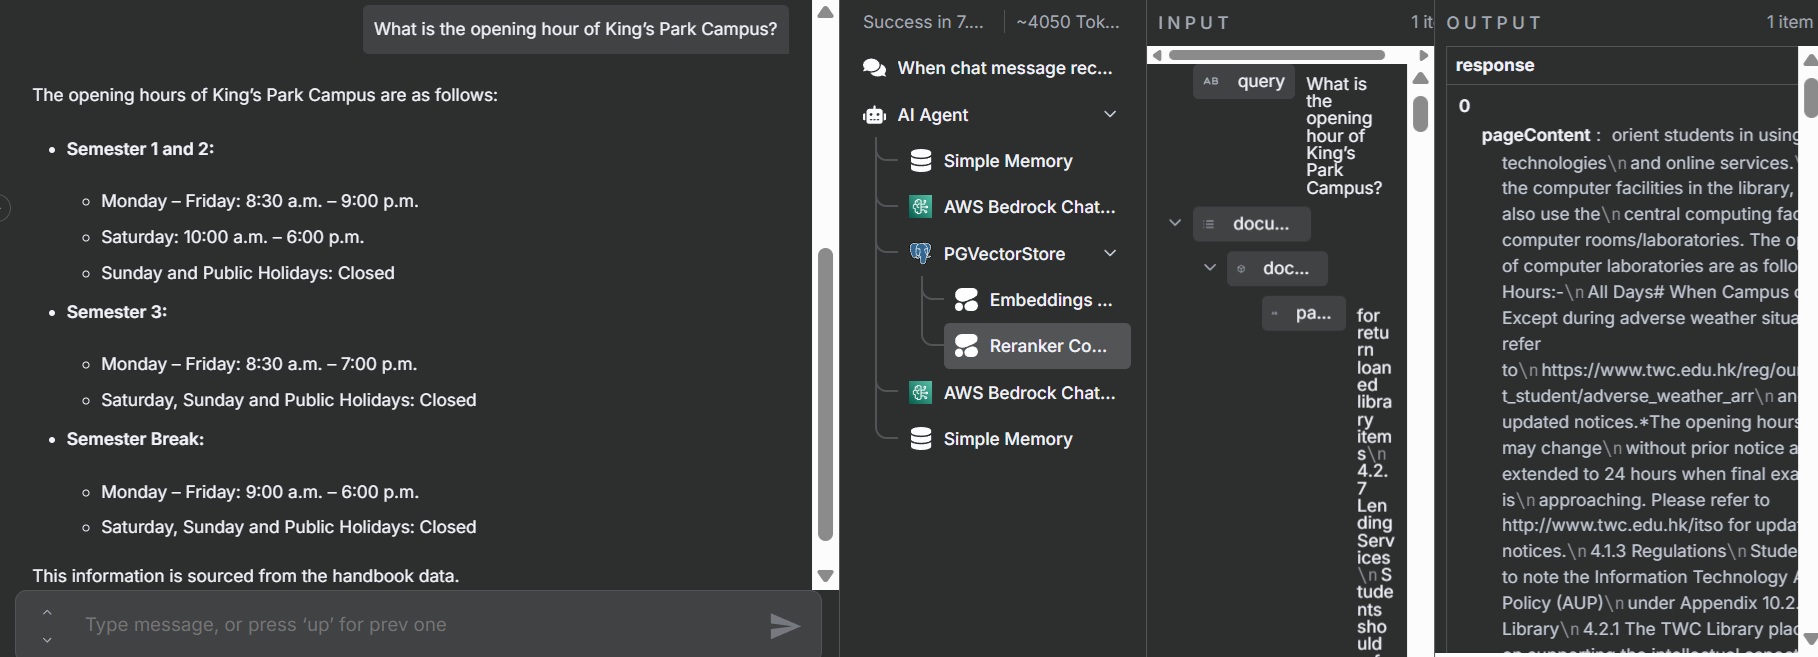
Testing the Workflow
- Activate the workflow in n8n.
- Open the chat interface and send test queries.
- Verify that the chatbot retrieves accurate information from the Tung Wah College handbook, citing sources correctly.
8. Conclusion
You have successfully create a robust Retrieval-Augmented Generation (RAG) AI workflow on AWS, enabling efficient document processing and querying
By leveraging Amazon Elastic File System (EFS), we’ve overcome the limitations of the previous setup, ensuring persistent storage of n8n workflow metadata.
The integration of Amazon Aurora Serverless PostgreSQL with the PGVector extension provides a high-performance vector store, enabling efficient similarity searches to power your chatbot’s contextual responses. Additionally, by incorporating AWS SNS, your workflow dynamically updates embeddings in the vector store whenever new or revised documents are uploaded.
To further optimize query accuracy, the use of a reranker model refines search results, boosting the relevance of retrieved documents and delivering more precise, user-focused responses.
This end-to-end solution resulted in an efficient RAG workflow capable of handling complex document queries with minimal manual intervention.
